IBM i Migration to Kyndryl Cloud Uplift on Azure Using Microsoft Azure Data Box
This guide is provided “as-is”. Information and views expressed in this document, including URL and other Internet website references, may change without notice and usage of the included material assumes this risk.
This document does not provide you with any legal rights to any intellectual property in any product. You may copy and use this document for internal reference purposes.
Table of Contents
- Introduction
- Key Takeaways
- Prerequisites
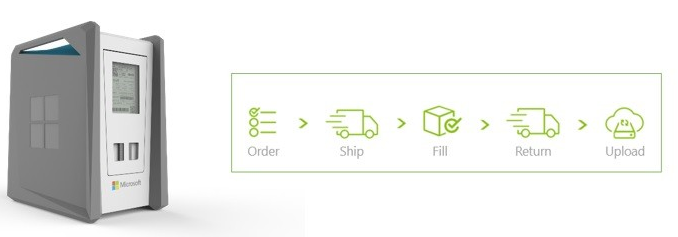
- Order and Configure the Azure Data Box
- Setting up the Azure Data Box in Customer Data Center
- Performing Backups of LPARs on the Azure Data Box
- Copying Backup .ISO files from Windows to the Azure Data Box
- Shipping the Azure Data Box to Microsoft
- Restoring data to the Kyndryl Cloud Uplift hosted LPAR
- Timing Estimates
- Next Steps
Introduction
There are multiple strategies to migrate IBM i LPARs to Kyndryl Cloud Uplift on Azure.
Migration using Azure Data Box is suitable when the customer has multiple Terabytes (TB) (>10) of data on an LPAR. The Azure Data Box is delivered to a customer data center and attached to a Windows server using SMB. The Windows server folder is then mounted to the IBM i LPAR using NFS. Data is then written from IBM i to the Windows folder and copied manually to the mounted Azure Data Box path.
This document provides an overview of the steps of this process and how to perform a restore on a Kyndryl Cloud Uplift hosted LPAR.
Data cannot be copied directly from IBM i to MDM as they used different transfer protocols. Any host-based replication tool can be used to perform the delta sync between the on-prem LPAR and cloud LPAR after the initial restore is done using the Microsoft Azure Data Box.
Objective
The objective of this document is to capture steps to perform the following activities:
-
Order and configure Azure Data Box
-
Attach Azure Data Box to on-prem Windows server using SMB
-
Mount Windows server folder to IBM i using NFS
-
Take IBM i backups using Windows NFS mount
-
Copy backup from Windows folder to Azure Data Box drive
-
Send Azure Data box to Microsoft Azure Data Center and restore data to Kyndryl Cloud Uplift hosted virtual LPAR
Prerequisites
-
On prem-server should be at the latest PTF levels
-
Customer should have an existing Azure Storage Account and an active Kyndryl Cloud Uplift on Azure subscription
-
The on-prem LPAR should be on V7R2 or later OS version of IBM i
-
There should be a 10 Gig FC port available on server/switch that can be used for communication with the Azure Data Box
-
Sufficient downtime should be provided for backups
-
Required LPPs should be installed on the LPAR
-
Transceivers for fiber ports on the Azure Data Box to make connection
-
On-prem Windows server with sufficient resources (disk space should be more than the amount of backup to be taken on each LPAR)
Order and configure the Azure Data Box
Please reference the Azure Data Box order instructions document
Setting up the Azure Data Box in customer data center
Use the steps in the link below to physically install the Azure Data Box in the customer data center
https://docs.microsoft.com/en-us/azure/DataBox/data-box-deploy-set-up
-
Add a Windows server in the environment with more disk space than the amount of backup to be taken
-
Assign an additional IP to the IBM i LPAR, the IP will be used for DST LAN console
-
Assign IPs to Windows VM and MDM device - the solution architecture should look like below with all 10 Gb connections
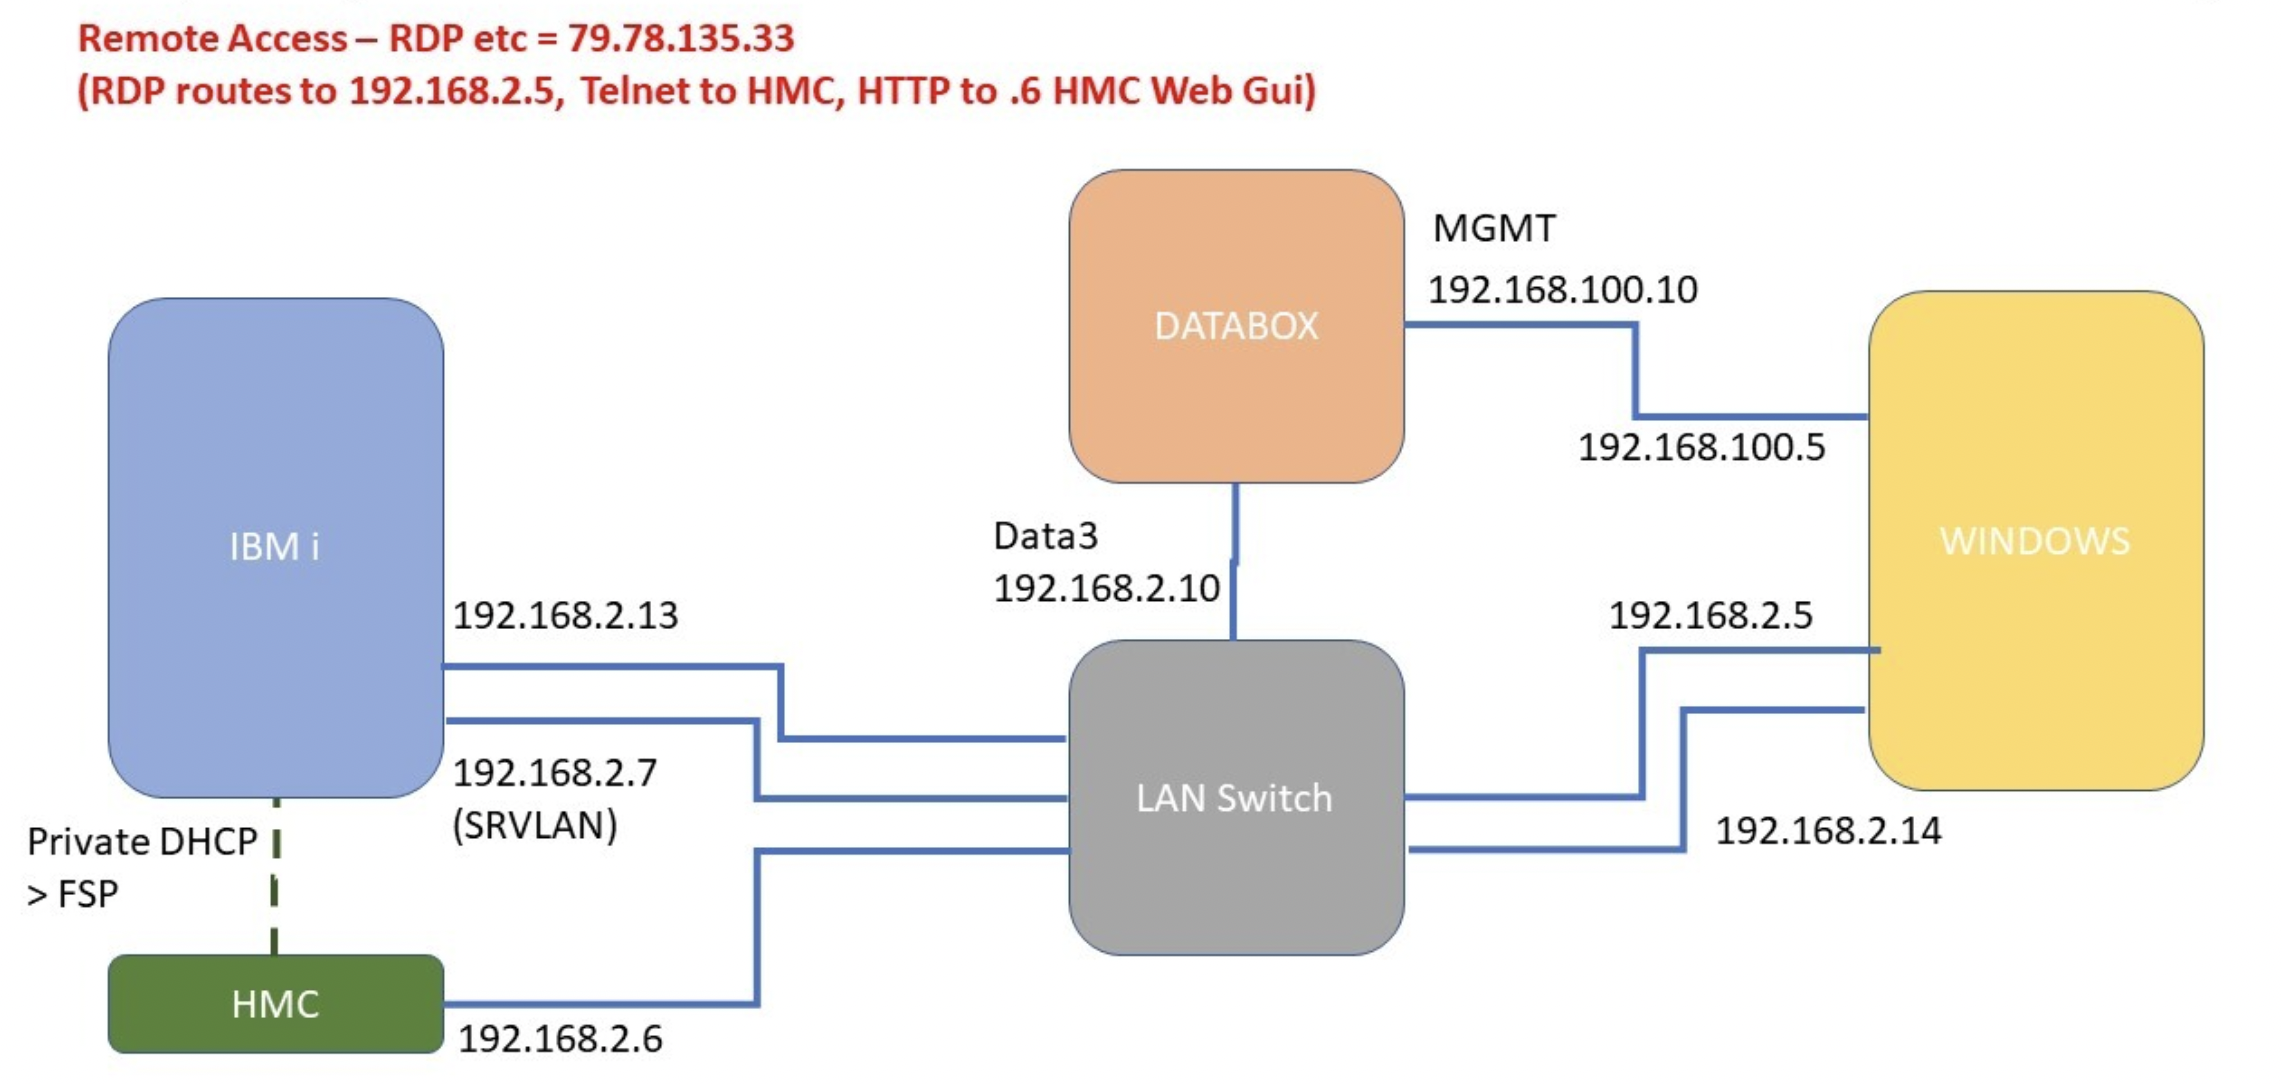
Connect Azure Data Box to Windows server (SMB)
-
Login to the Azure Data Box interface using the login credentials provided by Azure
-
Go to connect and copy-> NFS-> add the IPs of Windows and IBM i LPAR and save to allow communication
-
Go to connect and copy->settings-> enable SMB signing and restart the Azure Data Box (this allows data to be copied from Windows to the Azure Data Box drive)
-
On Windows command line run below command to mount the Azure Data Box path on y drive:
Net use y: \\192.168.2.10\\uksouthstg_blockblob /user:\<user ID>
You can get both the user ID and password from the Azure Data Box SMB settings page
For example:
Net use y: \\10.121.21.15\\nascskytapdatabox_blockblob /user:nascskytapdatabox
Connecting the IBM i LPAR to Windows server (NFS)
a) Windows - Install and configure NFS client on Windows server
-
Install NFS Server through Server Manager icon on taskbar
-
Server manager-> manage -> Add roles and features-> next-> role based-> next-> Expand file and storage services-> File and iSCSI services-> Server for NFS-> Add Features-> next-> Install- wait for install to complete
-
Server manager -> Tools-> NFS-> Right Click -> Property (it should be TCP+UDP)-> Activity Logging -> Select All-> apply -> ok-> Stop and Start the Service
-
-
Setup Folder to share via NFS
-
Create a folder called ‘backup’ on drive where the backup will be done
-
Right click on backup folder on Windows -> property-> Advanced-> change-> Type: Everyone-> Add-> Select Principle-> Everyone-> Full control-> Apply -> OK (this can be done on individual files too) (this allows data copy from NFS folder to DBx drive)
-
Do the same in property -> security advanced
-
Go to property of folder (backup) to be shared-> NFS sharing -> manage-> select share-> select allow anon access-> permission-> select read-write and allow root access for ALL MACHINES-> apply and OK
-
b) IBM i - Mount NFS folder on IBM i directory
- Create mount path on iSeries server:
MKDIR DIR('/Windows')
-
Add the cfgtcp option 12, host name, domain name and *local
-
Cfgtcp 10: add entry for local IP with hostname and domain name, and entries for Windows server
-
Mount the NFS server directory on path created:
Mount Type(\*NFS) MFS('\<ip of Windows>:/\<Windows folder>')
MNTOVRDIR('/\<server directory>')
For example:
Mount Type(\*NFS) MFS('**10.74.74.157**:/backup')
MNTOVRDIR('/Windows')
- Create ISO images for backup by running below commands:
CALL PGM (QP2TERM)
cd /Windows
dd if=/dev/zero of=IMAGE01.ISO bs=1M count=100000 (100 GB)
dd if=/dev/zero of=IMAGE02.ISO bs=1M count=100000 (100 GB)
Note: You will create a number of images depending on size of backup data
- Create volume list by running below commands:
touch VOLUME_LIST
echo 'IMAGE01.ISO W' >\> VOLUME_LIST
echo 'IMAGE02.ISO W' >\> VOLUME_LIST
cat VOLUME_LIST
F3 out
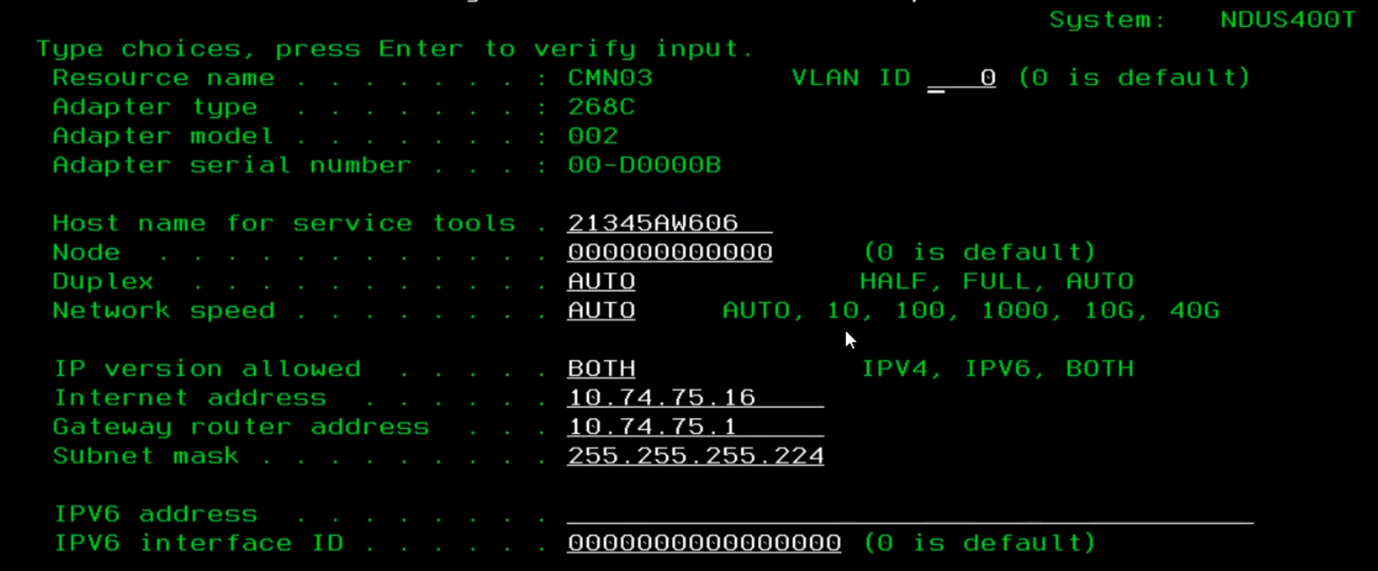
c) Assign the LAN console IP using SST using steps in the link below.
https://www.ibm.com/docs/en/i/7.3?topic=dst-configuring-service-tools-server-using-sst
Below is an example:
d) Create device by running below commands:
CRTDEVOPT DEVD(NFSDEV01) RSRCNAME(\*VRT) LCLINTNETA(\*SRVLAN)
RMTINTNETA(\<window server ip> ) NETIMGDIR('/backup')
VRYCFG CFGOBJ(NFSDEV01) CFGTYPE(DEV) STATUS(\*ON)
e) Run below command to verify that you can see backup images created:
WRKIMGCLGE \*DEV NFSDEV01
f) Initialize the volumes:
LODIMGCLGE IMGCLG(\*DEV) IMGCLGIDX(2) DEV(NFSDEV01)
INZOPT NEWVOL(IVOL02) DEV(NFSDEV01) CHECK(\*NO)
LODIMGCLGE IMGCLG(\*DEV) IMGCLGIDX(1) DEV(NFSDEV01)
INZOPT NEWVOL(IVOL01) DEV(NFSDEV01) CHECK(\*NO)
Note: You will run these commands for all of the ISO images created
Performing backups of LPARs on the Azure Data Box
Create and initialize sufficient optical ISO files on Windows server so that the backup can be completed successfully.
You can choose from the below backup solutions depending on your migration strategy:
-
GO save 21
-
Individual libraries backups
-
Backups of save files for tape migration activity:
For tape migration the customer needs to identify libraries/directories whose backups they want to migrate to cloud. This method is not applicable for copying full tapes to the cloud as we can only migrate backups of selected libraries/directories to the cloud.
Below are the high-level steps:
-
Identify the tapes and data to be migrated to cloud
-
Restore the data on the on-prem server in library identifying the backups details (date and content)
-
Save the libraries in .ISO file named according to the content
Example: 021120Daily.ISO
-
Move the data from the Azure Data Box to Azure Storage Blob and keep it there for future use
-
Perform backup go save option 21/22/23 or save individual libraries using SAVLIB command, just specify the device as NFSDEV01
Copying backup .ISO files from Windows to Azure Data Box
The backup files need to be copied from the backups folder to the required folder in the Azure Data Box drive on the Windows server.
After this, the Azure Data Box is ready to be shipped to Microsoft.
Shipping the Azure Data Box to Microsoft
Please reference Tutorial to return Azure Data Box document
Restoring data to a Kyndryl Cloud Uplift Hosted LPAR
The Azure Data Box data will be copied to your Azure Storage Account as Block Blob.
-
The ISO files need to be downloaded from Azure blob to your Kyndryl Cloud Uplift hosted Windows VM to restore the LPAR. Azure Storage Explorer is the recommended tool to perform this action.
-
Once the backup .ISO files are downloaded to Kyndryl Cloud Uplift Windows VM, FTP the required files to NFS IBM i LPAR or target IBM i LPAR depending on backups strategy.
-
Restore from a GO save 22+23 backup referring to the document below:
IBM i migration to Kyndryl Cloud Uplift – GO save option 22+23
-
Restore the individual libraries backups libraries from the .ISO image file by loading it on an image catalog and using RSTLIB command
-
Tape migration restores
-
Restore the backup ISO file from cloud blob to Windows server
-
FTP from Windows to IBM i target LPAR
-
Create image catalog specifying the directory where .ISO is
-
ADDIMGCLGE for all .ISO file
-
Restore the libraries from the .ISO file to target LPAR’s required library
Timing Estimates
Below is the time estimate for some time-consuming activities
- Creation of .ISO on Windows NFS mount :3 hrs to create 1*400 GB .ISO
The best approach is to create 4 .ISO file on parallel sessions (takes around 5 hrs)
- Copy of file from Windows to Data Box SMB drive: 1*400 Gb file took 1 hr 45 mins
Running 2 parallel copy gave the best speed in our tests
-
Copy file from blob to Windows: 2*400 GB files copy in parallel took 2 hrs 30 mins
-
FTP from Windows VM to IBM i target LPAR (same environment): 1*400 GB files in parallel took 1 hr 10 mins
Parallel FTP did not increase the overall speed. Be sure that the IBM i FTP parameters are tuned to give the best transfer speed.
Next steps
Main Overview
Operational Excellence
Resiliency
Kyndryl Cloud Uplift Resiliency Pillar
Migration Solutions
Design
Security