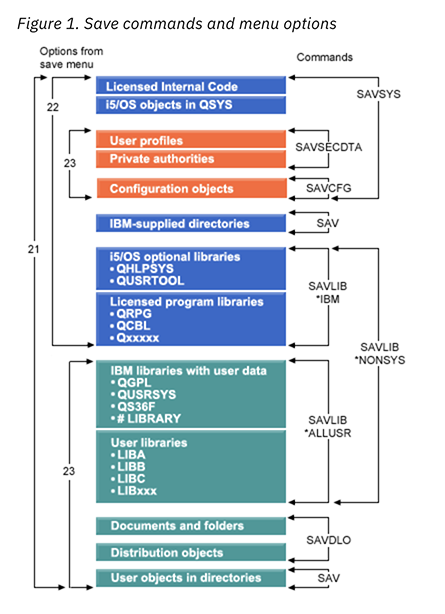
IBM i workload migration using Go Save/Restore, Option 22-23
This guide is provided “as-is”. Information and views expressed in this document, including URL and other Internet website references, may change without notice and usage of the included material assumes this risk.
This document does not provide you with any legal rights to any intellectual property in any product. You may copy and use this document for your internal, reference purposes.
Table of Contents
- Key Takeaways
- Before you begin
- Determining size to be backed up on ISO optical image
- Create virtual optical media
- Save, Option 22 to virtual optical media
- Create virtual tape media
- Deploy IBM i in Kyndryl Cloud Uplift cloud
- Network configuration
- Go Restore, Option 23
- APPENDIX
Key Takeaways
This documentation will demonstrate how an IBM I workload can be migrated to an LPAR on Kyndryl Cloud Uplift using an IBM i backup and recovery method referred to as “Go, Save Option 22,23”, because of the commands which are used to take and restore the backups on the IBM i system.
The goal of this document is to perform a full-system recovery including LIC and OS installation.
Before you begin
-
Install latest PTFs on IBM i with below individual PTFs installed
- Minimum PTF level for IBM i
-
Utilized ASP should be less than 48% in IBM i LPAR. Amount of disk space can be reduced by doing clean up as mentioned in the link below:
-
Azure storage account with blob storage container and valid SAS key
- Create Azure storage account as required, and generate SAS token
-
AZCopy the virtual tapes from the NFS mounted directory into Azure object storage container
-
Linux / Windows server in on-premise network, preferably close to IBM i server, preferably Linux with desktop environment over Windows, no specific storage/compute requirements, installation of AZCopy utility
*Note: Many of the commands below will use example file names, directory names and sizes. Please replace these according to your environment.
For example, in the command
CRTIMGCLG IMGCLG(***skytap30GB***) DIR(\'*/**skytap30GB**\'*)
Replace *skytap30GB to the variable in your environment.*
Back to the Top
Determining size to be backed up on ISO optical image
-
Go Disktasks, Option-1 to collect disk space information (https://www.ibm.com/support/pages/go-disktasks-overview )
-
OR, same can be run using RTVDSKINF command
-
RTVDSKINF job will be submitted in WRKACTJOB, depending on the system size, command completion may vary system to system
-
Once the job completes, print information using PRTDSKINF or Go Disktasks, Option 2.
-
In report type, select library
-
WRKSPLF, display PRTDSKINF report
-
Review QUSRSYS, QGPL, QSYS, LIC and IBM libraries size. Accordingly, create the optical media size
- Add these up to size our<img src=”https://raw.githubusercontent.com/skytap/well-architected-framework/master/resiliency/solutions/GoSave/gosavemedia/ optical image, since Option 22 save includes LIC and Objects. (Generally, the maximum size seen for the sum of these is ~50 GB)
Back to the Top
Create virtual optical media
https://www.ibm.com/docs/en/i/7.2?topic=storage-setting-up-virtual-optical
> CRTIMGCLG IMGCLG(skytap30GB) DIR(\'/skytap30GB\')

> ADDIMGCLGE IMGCLG(skytap30GB) FROMFILE(\*NEW) TOFILE(skytap30GB.iso) IMGSIZ(30000)
Example image above shows 15 GB image size. Commands listed use 30 GB size. Size according to your own needs.
-
CRTDEVOPT DEVD(skyopt30GB) RSRCNAME(*VRT)
-
VRYCFG CFGOBJ(skyopt30GB) CFGTYPE(*DEV) STATUS(*ON)
-
LODIMGCLG IMGCLG(skytap30GB) DEV(skyopt30GB)
-
INZOPT NEWVOL(MYVOLUMEID) DEV(skyopt30GB) CHECK(*NO) TEXT(DESCRIPTION)
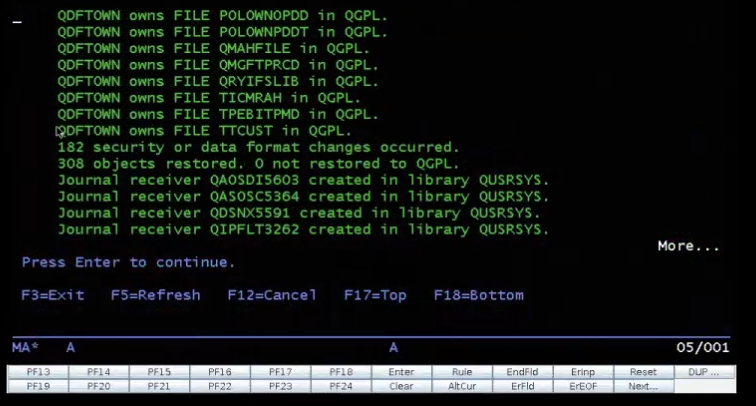
Step 2: Save, Option 22 to virtual optical media (on Source System)
-
Bring system to restricted state using ENDSBS *ALL *IMMED
-
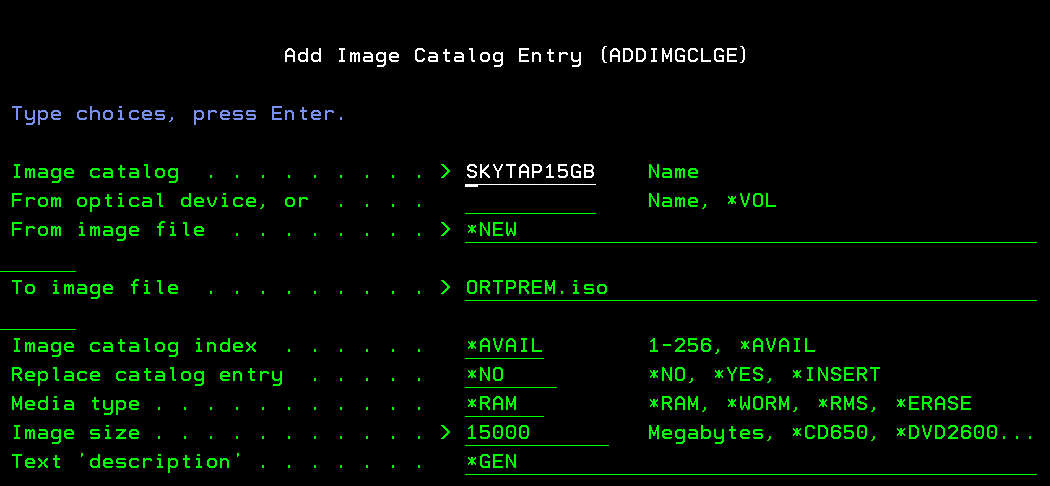
Go Save, Option22 (run command GO SAVE , then choose option 22)
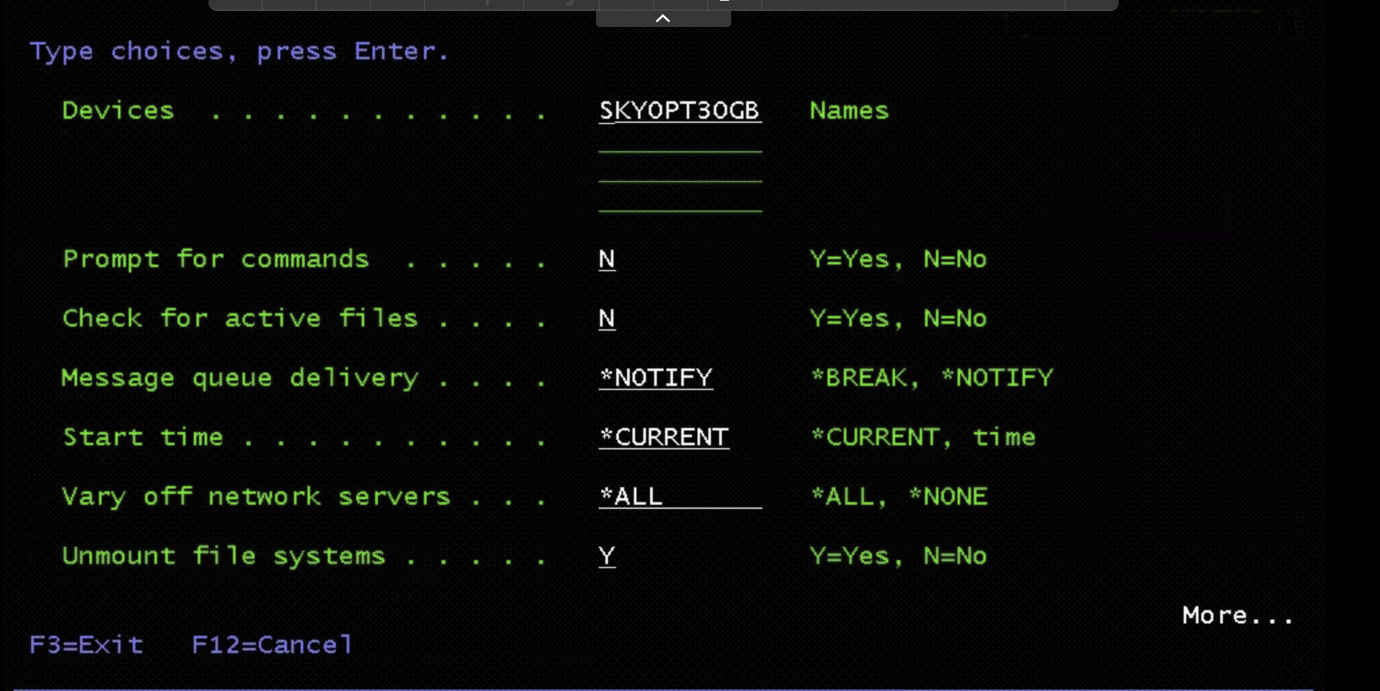
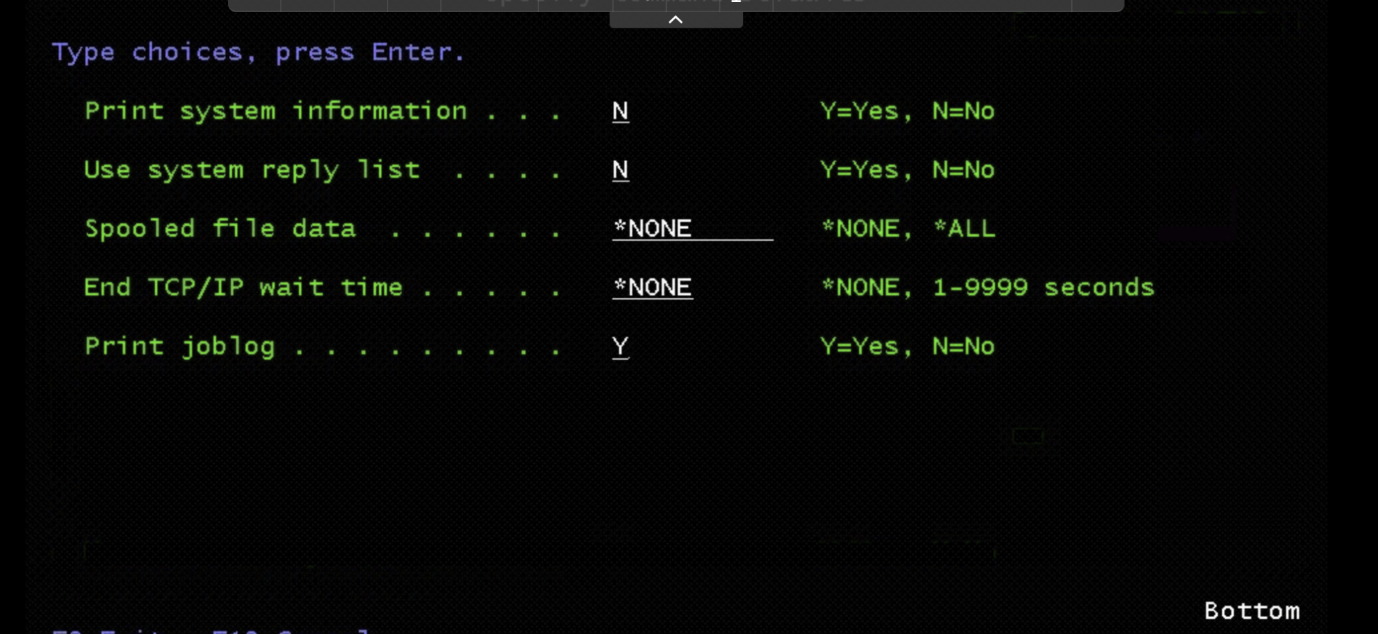
-
Change the parameters as shown in the screen shot above.
-
At bottom of screen, it will show progress (ex. “Started processing 16177 objects, completed 14000 objects.”).
Step 3: Save QGPL and QUSRSYS to append to existing ISO (on Source System)
-
End subsystems again (using command ENDSBS *ALL *IMMED) to save QGPL and QUSRSYS
-
Save QGPL and QUSRSYS and append to existing ISO in Optical device:
-
On the command line, type SAVLIB, F4 to prompt: (Specify QGPL first, then QUSRSYS)
-
Choose Existing Optical device (in this example, we have been using ‘SKYOPT30GB’)
-
F10 for more options
-
Change parameters:
-
Spooled file data = *NONE, to not include output queues
-
Save file data = *NO
Step 4: Create virtual tape media (on Source System)
Create virtual tape image Catalog for Option 23 data
[https://www.ibm.com/docs/en/i/7.3?topic=tape-setting-up-virtual-storage]{.ul}
-
CRTIMGCLG IMGCLG(CLG1) DIR('/CLG1DIR') TYPE(*TAP)(Create an empty tape catalog.)
-
ADDIMGCLGE IMGCLG(CLG1) FROMFILE(*NEW) TOFILE(VOL001) IMGSIZ(10000) VOLNAM(VOL001)
- Repeat for each volume
-
CHGATR OBJ('/tape/catalog1') ATR(*ALWSAV) VALUE(*Yes) Subtree(*All)
-
Determine tape size based on over-all data size, you must pre-create each tape required for the total Option 23 save.
-
Bring system to restricted state (using command ENDSBS *ALL *IMMED) and run the command GO SAVE, and choose Option 23
-
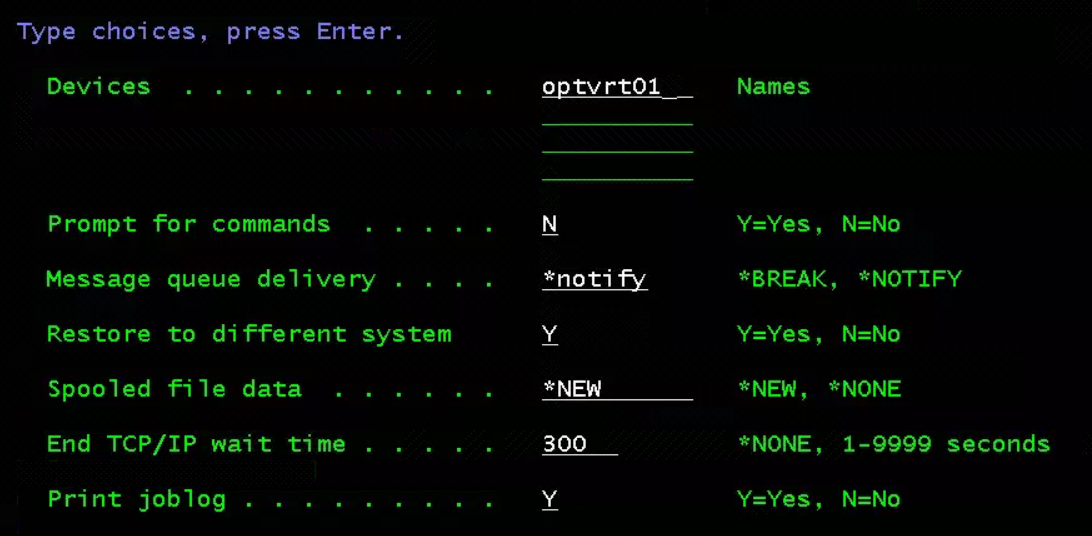
On the “Specify Command Defaults” screen, specify device name according to your environment. Page down and Press Enter.
Step 5: Deploy IBM i in Kyndryl Cloud Uplift cloud (using NFS LPAR and Target System)
- Before we initialize the target system, we must first transfer the Optical ISO image to IBM i NFS server. The file transfer method is up to user choice- examples of file transfer methods include FTP, AZCopy using Azure storage account, or BRMS + ICC. After transferring these files to the NFS LPAR, Follow the steps for IBM i recovery using IBM i NFS server to transfer files to the target system:
Step 5A: Do these steps on the NFS LPAR
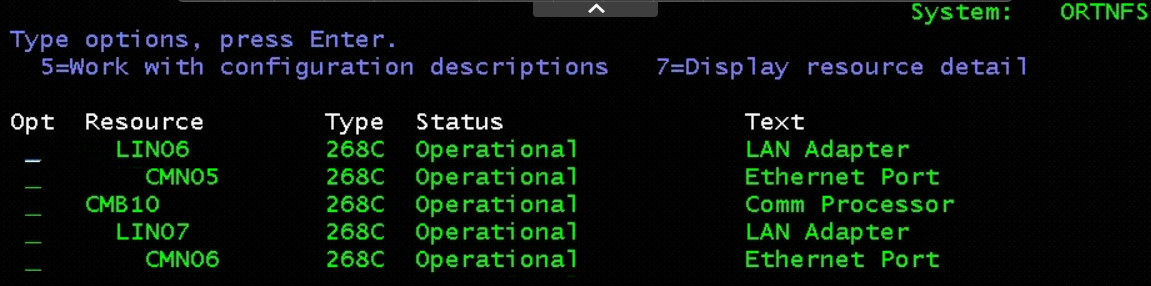
- WRKHDWRSC *CMN – Press Enter
Make note of the Communication Resources that are Operational – it will be associated with the Ethernet line(s)
 {width=”6.133333333333334in”
5A.1: Create Virtual Optical Device
-
Sign on to your NFS LPAR
-
CRTDEVOPT DEVD(OPTVRT01) RSRCNAME(*VRT)
-
VARY ON the Optical drive
- Do this by Choosing Option 8 in WRKDEVD Optvrt01 command.
5A.2: Create image catalog
-
CRTIMGCLG IMGCLG(IMGCATALOG) DIR('/DIR') TYPE(*OPT) CRTDIR(*YES)
- CRTDIR(*YES) only necessary if directory does not exist
Directory specified here should be the same directory as where the .iso file was created.
5A.3: Add image to Image Catalog
-
ADDIMGCLGE IMGCLG(ORTPREM) FROMFILE(‘/IMGCATALOG/Kyndryl Cloud Uplift30GB.iso’) TOFILE(‘*fromfile’)
-
Use F10 to see all parameters when adding
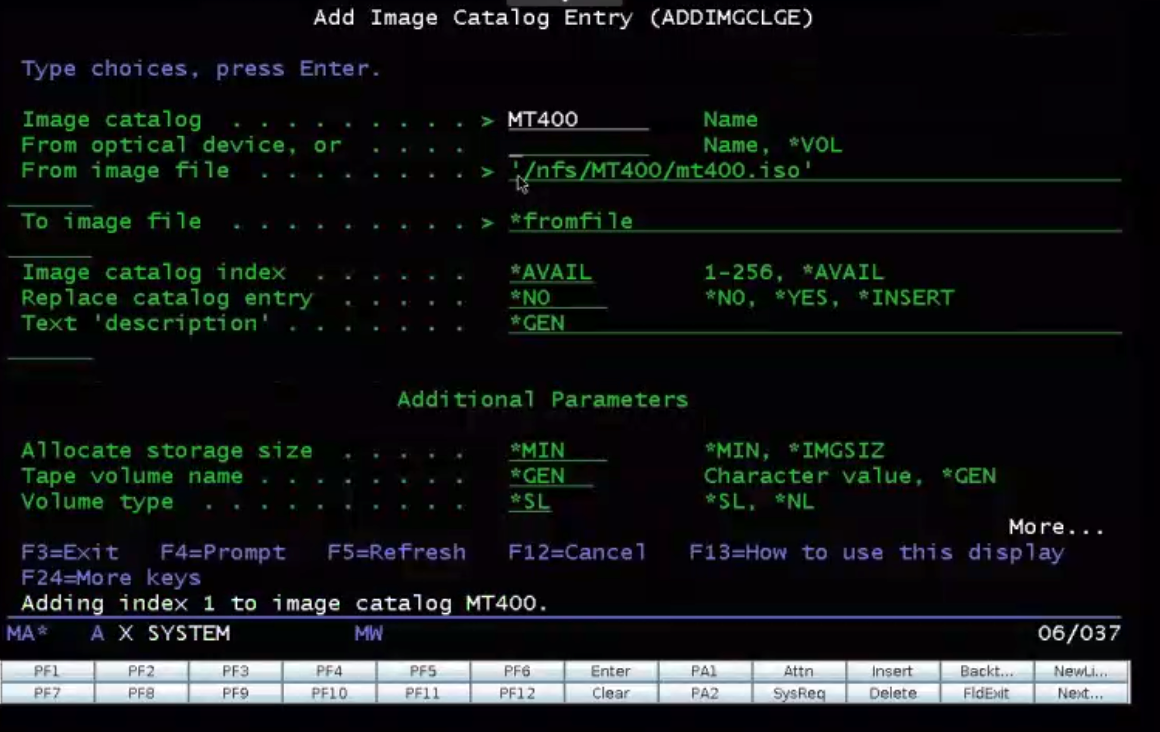
Example view of screen after pressing F10 to see parameters
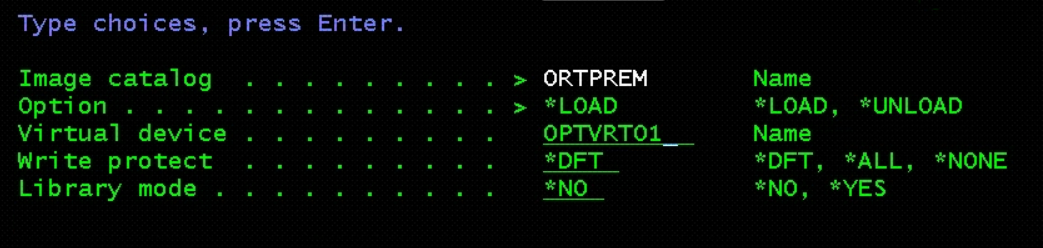
5A.4: Load Image Catalog
-
Load image catalog to Optical drive
-
Type WRKIMGCLG – Press Enter
-
Virtual Device name will be the device you created in prior steps
-
Type 8 – Press Enter
-
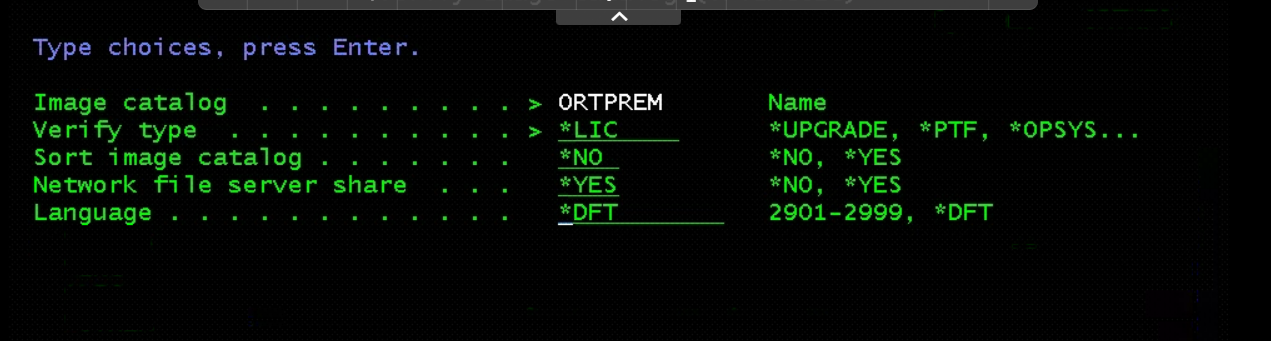
5A.6: Verify image Catalog (May take a few minutes)
-
On the next screen, for the image catalog you just created
-
Type 10 – Press Enter
-
On Verify Image Catalog screen:
-
“Verify type” = *LIC
-
“Network file server share” = *YES
-
Other settings stay default
-

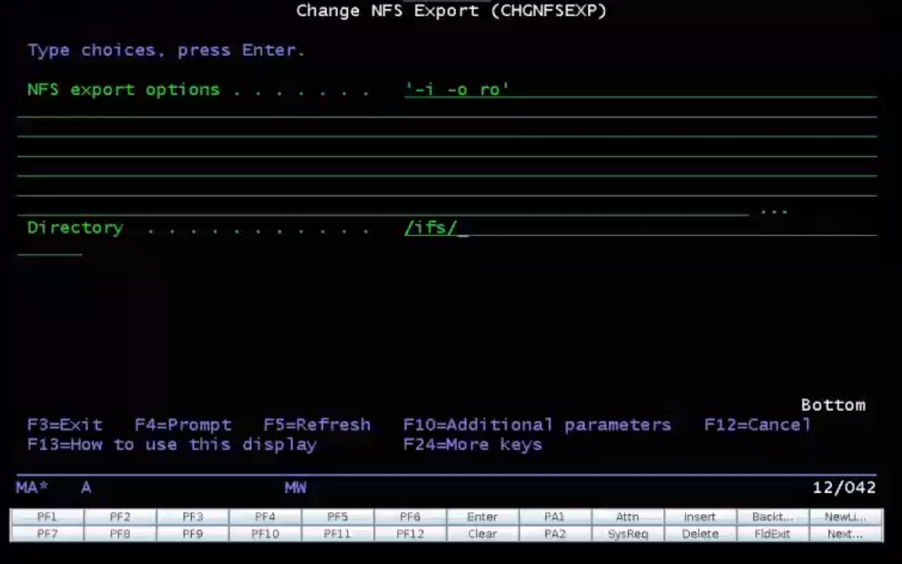
5A.7: Start the NFS server and change NFS export options
- STRNFSSVR SERVER(*All)

-
CHGNFSEXP OPTIONS(‘-i -o ro’) DIR(‘/xx’)
- Don’t forget the single quotation marks!
5A.8: Change object authorities and TFTP attributes:
-
CHGAUT OBJ('/Dir’) USER(*PUBLIC) DTAAUT(*RWX) SUBTREE(*ALL)
-
CHGTFTPA AUTOSTART(*YES) ALTSRCDIR('/Dir’)
-
CHGAUT OBJ('/Dir’) USER(QTFTP) DTAAUT(*RX) SUBTREE(*ALL)
5A.9: Restart the TFTP server (This is how the client and the target LPAR will be communicate):
-
ENDTCPSVR SERVER(*TFTP)
-
STRTCPSVR SERVER(*TFTP)
Step 5B: Follow the steps below on the IBM i Client (Target) LPAR
-
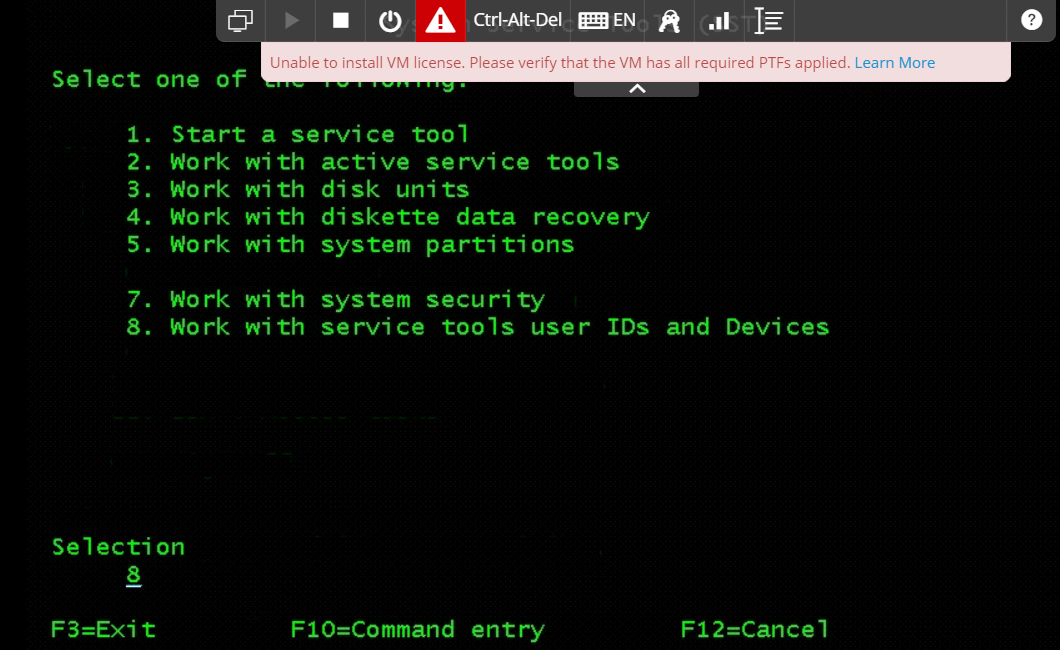
Login to SST (Service Tools) by typing STRSST then press enter
- Enter the following information:
-
Service Tools User ID: The service tools user ID you sign on with. (Default is QSECOFR)
-
Password: The password associated with this user ID. (Default is QSECOFR)
-
If you do not know the QSECOFR SST password, it can be reset using CHGDSTPWD *Default
- Select option 8 – Work with service tools User IDs and Devices
- Press F13 and select the LAN adapter
The LAN adapter needs to be on the same VLAN as IBM i NFS server.
- Configure service tools LAN adapter:
-
IP version allowed = IPV4
-
Internet address = you can use the same IP of the client (TARGET)
-
Gateway router address = use the same gateway on the client
-
Subnet mask = use the same
-
Press F7=Store
-
Press F13= Deactivate
-
Press F14=Activate
Use F3 to exit out of Service Tools.
In some cases, you may not find the LAN adapter in SST if the LPAR is has only one adapter. Follow below steps to disable the ethernet line and TCP services. Once the IP and Ethline are varied Off, the adapter is free and can be seen in the SST.
-
CFGTCP, Option 1
-
Use Option 10 to end the IP
-
WRKLIND
-
Use option 8(Work with status) in front of Ethline
-
Use option 2 to vary off
-
Verify port 3000 status as active using NETSTAT
-
From command line type NETSTAT, specify *CNN – Press F14 to display port numbers
-
TCP must be started
-
-
Create client server optical device
-
From command line type CRTDEVOPT, type the choices below, Press F4 to prompt
-
Device Description = Can be any name here
-
Resource Name = *VRT
-
Device Type = *RSRCNAME
-
-
Local internet address = *SRVLAN
-
Remote internet address = the IP address of the IBM i VSI NFS Server
-
Network image directory = ‘/xx’
Use Option 1 to Vary On the optical device.
-
Vary on the optical device created in previous step and verify.
-
Access the remote image catalog using WRKIMGCLGE IMGCLG(*DEV) DEV(OPTVRT01)
-
Or, WRKIMGCLGE then F4 to Prompt. On the next screen:
-
Image Catalog = *DEV
-
Device Name = Optical device name
-
-
-
Start network install:
- STRNETINS press F4 to prompt
-
Network optical device = Optical Device
-
Installation option = *LIC
-
Keylock mode = *MANUAL
This completes step sections 5A and 5B. The next steps will continue with Step 5 which is the process of initializing and configuring the target system in Kyndryl Cloud Uplift.
-
Installing LIC:
- On Install LIC screen, choose Option 1 to Install Licensed Internal Code.
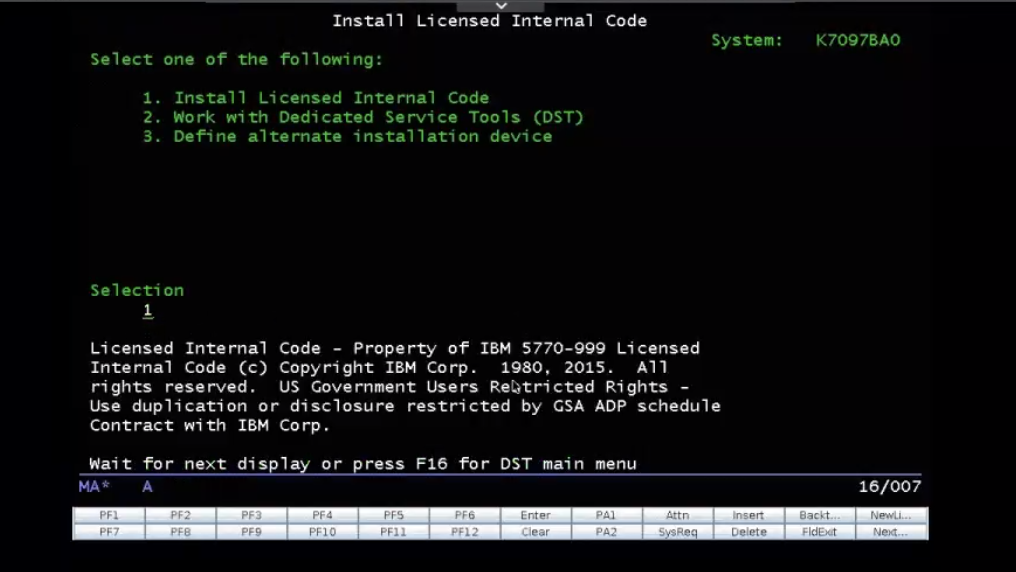
- F10 to Continue
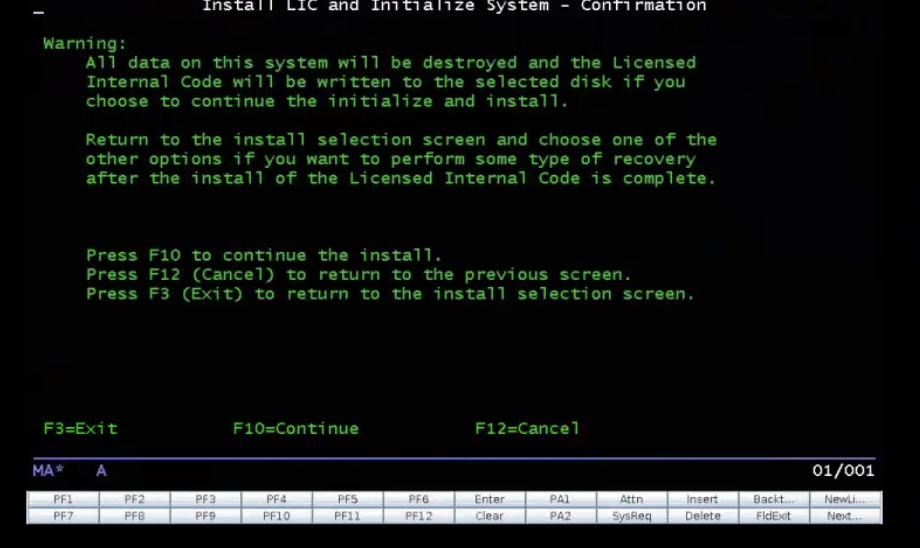
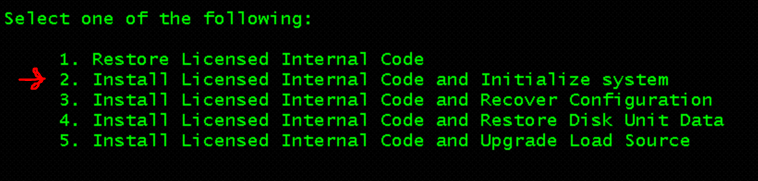
- Choose Option 2 to Install LIC and Initialize system (On the target system that we will be building from the scratch
- Press F10 to continue
- Post LIC Installation, Do Disk Initialization: Initialize non configured disks and add to ASP
-
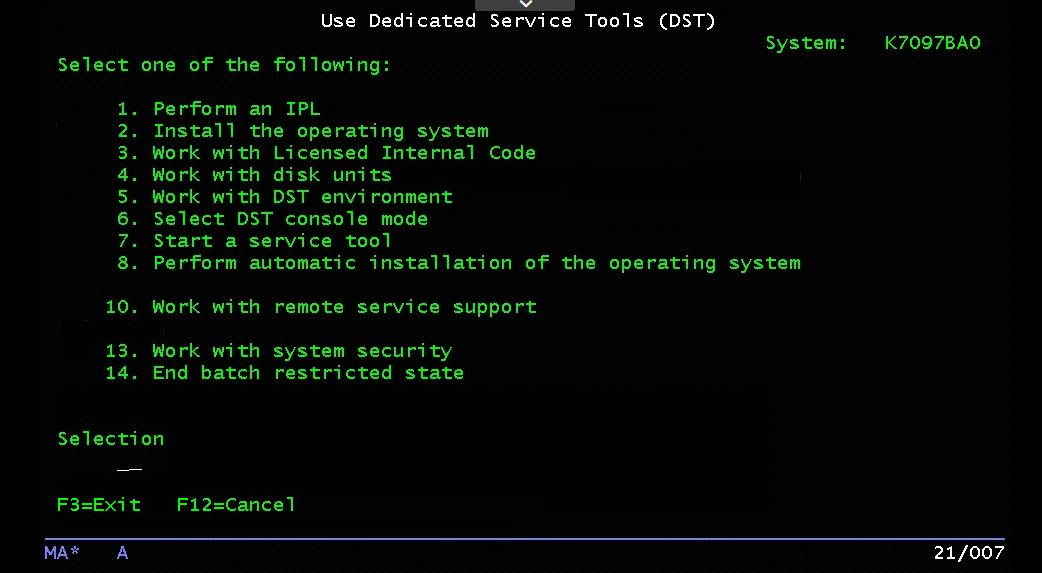
Select Option 3 to Enter Dedicated Service Tools (DST).
-
Username: QSECOFR is default
-
Password: QSECOFR is default
-
-
From the DST Menu
-
Select Option 4 – Work with Disk Units from DST menu
-
Select Option 1- Work with Disk Configuration on the with Disk Units display.
-
-
To add Disk to ASP and Balance ASP
-
Select Option 3- Work with ASP configuration on the Work with Disk Configuration display.
-
Select Option 3- Add units to ASPs, or, to add units to ASPs and also balance data choose Option 8- Add units to ASPs and balance data on the Work with ASP Configuration display.
-
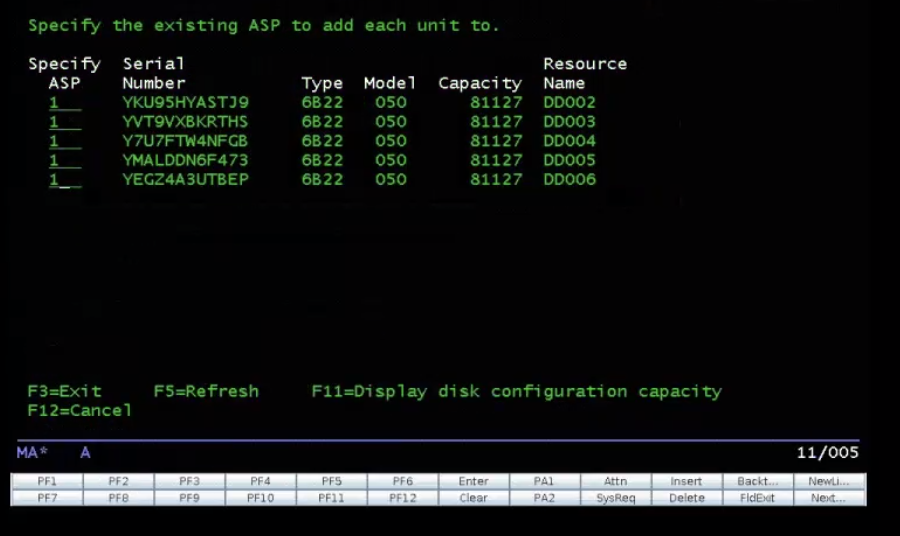
Select option 3 to add units to existing ASPs.
-
-
Enter a 1 in each “Specify ASP” field. Press enter each time.
- A “Problem Report” screen will appear. Press F10 to ignore problems, F10 to add and balance.
Disk Configuration will begin. This process will take several minutes. When this completes, move on to install the operating system.
- Install OS using below option (Select Option 2- Install the operating system):

In the device type, Select Option 5 – network device
-
Log in using QSECOFR
-
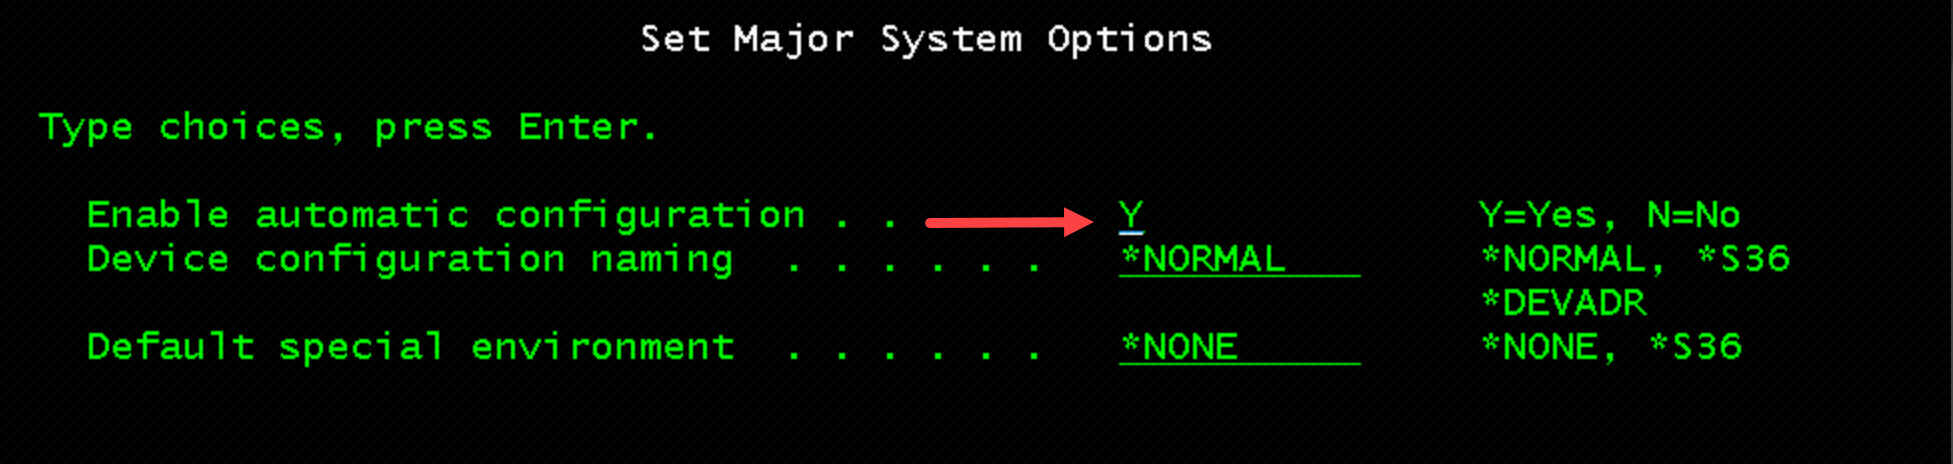
Enable automatic configuration – Y on set major system option screen.
- Change following on next screen:
-
Set date and time.
-
Choose System Time Zone
-
Start print writers = N
-
Start system to restricted state = Y
-
Set major system options = Y
-
Define or change system at IPL = Y
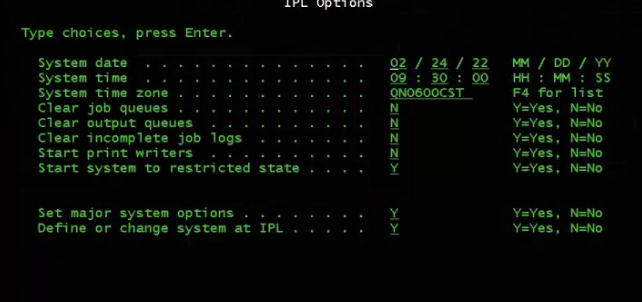
Press enter to continue.
- Select Option 3 twice (Select System Value Commands > Work with System Values) to change the following system values:
-
QALWOBJRST _______________ *ALL
-
QFRCCVNRST _______________ 0
-
QINACTITV _______________ *NONE
-
QJOBMSGQFL _______________ *PRTWRAP
-
QJOBMSGQMX _______________ 30 (minimum, 64 recommended)
-
QLMTDEVSSN _______________ 0
-
QLMTSECOFR _______________ 0
-
QMAXSIGN _______________ *NOMAX
-
QPFRADJ _______________ 2
-
QPWDEXPITV _______________ *NOMAX
-
QSCANFSCTL _______________ *NOPOSTRST
-
QVFYOBJRST _______________ 1
- Press F3 twice and change the QSECOFR password.
Note: the current QSECOFR password will be QSECOFR (capital letters). The new password must be between 6 and 8 characters and is case-sensitive.
- Create optical device using CRTDEVOPT, Press F4
-
Local internet address = *SRVLAN
-
Remote internet address = the ip address of the IBM i NFS Server
-
Network image directory = ‘/xx’
-
Vary ON the device using WRKDEVD command
- Restore QGPL and QUSRSYS
-
RSTLIB, F4 to prompt
-
Select QGPL and QUSRSYS
-
Select existing optical Device
-
F10
-
MBROPT (Database member option) to *ALL
-
Page down
-
Select ALWOBJDIF (Allow object Differences) as *ALL
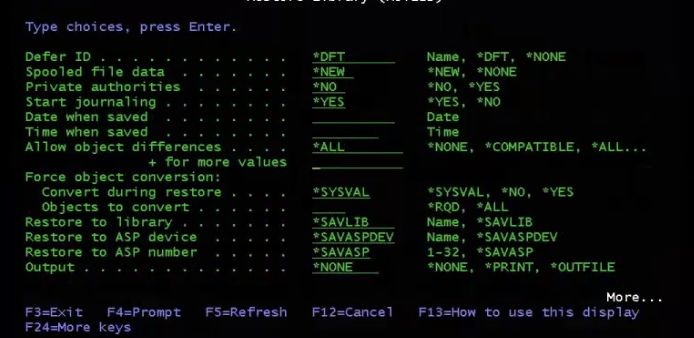
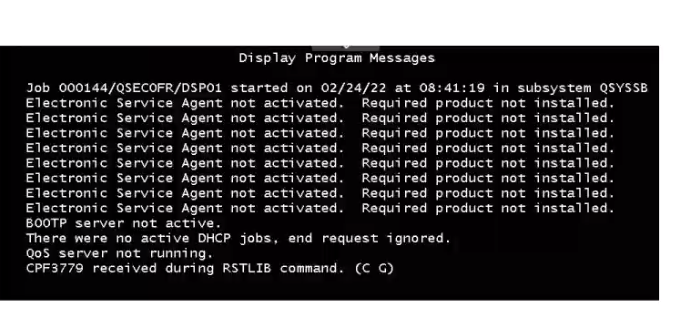
- Press enter to begin restoring. QUSRSYS and QGPL should have 0 “object not restored” when complete.
Note: If you see the error message below, “File not selected…” when running command, F1 on error to view logs and scroll to bottom. As long as you see that “0 objects not restored”, QGPL and QUSRSYS restore was successful.
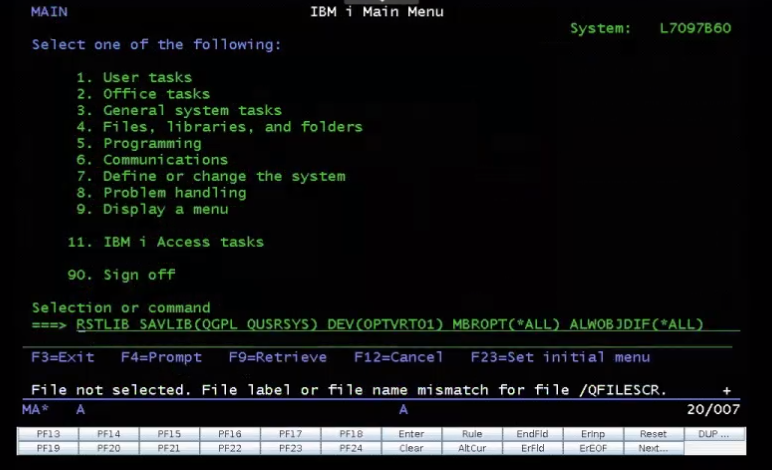
Error message shown here
“0 objects not restored” in Job Logs.
- Go Restore, Option 22 using below options:
*Specify device name according to your environment.
Type “G” and press enter to Go Ahead.
If you see Error Messages, hit F1. View Job Logs. Page down to read errors logs. There will be a few objects which will not be restored as the “allow Object to be Saved” Attribute for those objects was set to N. F3 to Exit and move on.
Step 6: Network configuration (on Target System)
Once the LAN adapter is added in the UI, a new Ethernet line needs to be created, with TCP configured for it.
6.1. Configure DHCP
-
From command line, type WRKHDWRSC *CMN
-
Check resource name associated with Communication Resource-
-
IBM i 7.2/7.4 is typically CMN04,
-
IBM i 7.3 is typically CMN05.
-
You will use one of these in the next command.
-
-
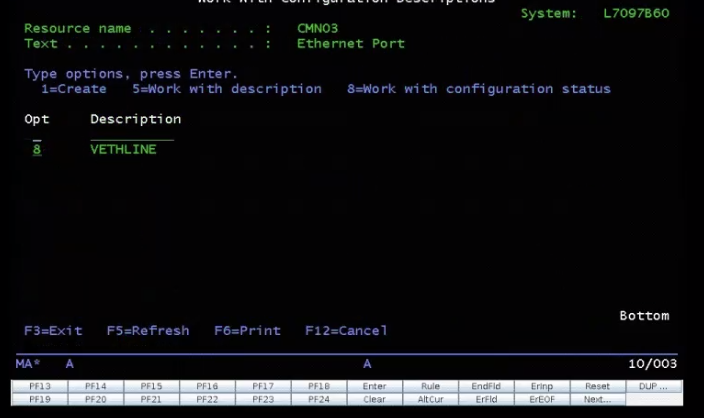
See that CMN03/CMN04/CMN05 is The Ethline. Select resource with option 5 to view details.
-
Delete any existing Ethline (or, if line exists, vary on with option 8. If line doesn’t exist, use option 1 to create it with Name Ethernet or whatever you want. Vary on with 1 afterward. Exit to main menu using F3)
-
Exit using F3.
6.2. Create the Ethernet Line (if you deleted existing ethline)
-
CRTLINETH LIND(ETHLINE2) RSRCNAME(CMN05)
-
Type WRKCFGSTS *LIN
-
Option 1 to VARY ON the ETHLINE2
-
Wait 10-20 seconds, hit F5 to refresh and confirm if ETHLITCP is Varied On.
-
6.3. Configure Default route and DNS using CFGTCP Command
- From command line, type CFGTCP
-
Option 2 to work with routes.
-
Remove any state route with option 4
-
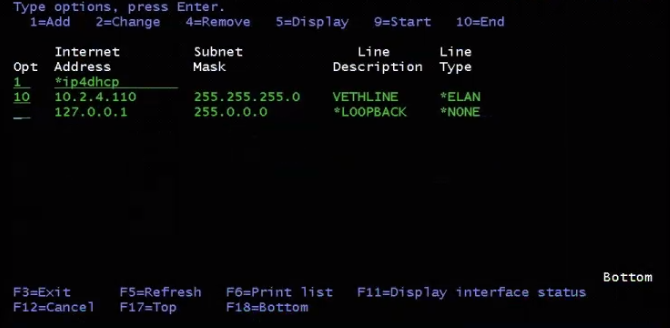
Option 1- Work with Interfaces
-
If one doesn’t exist:
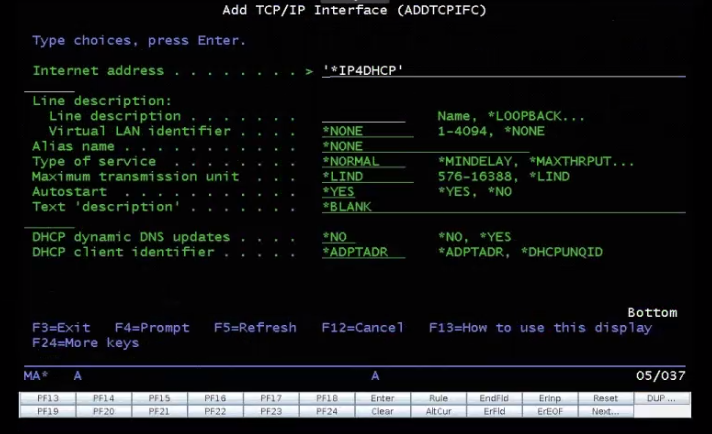
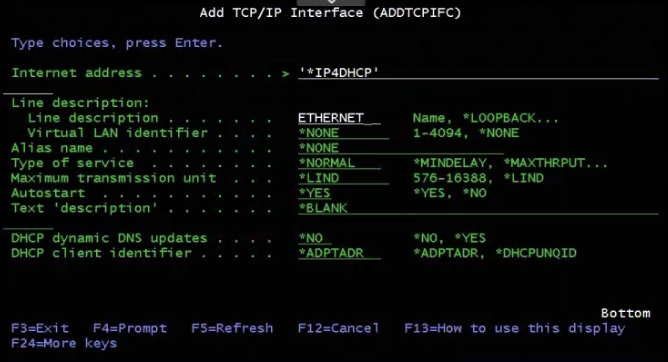
- Add one with the internet address of *IP4DHCP with Line Description of ETHLINE2

Use option 1 to add *IP4DHCP
-
Hit enter twice to save it
-
Go to *IP4DHCP, selection F11 to view status
If Interface Status is Inactive, use Option 9 to start it
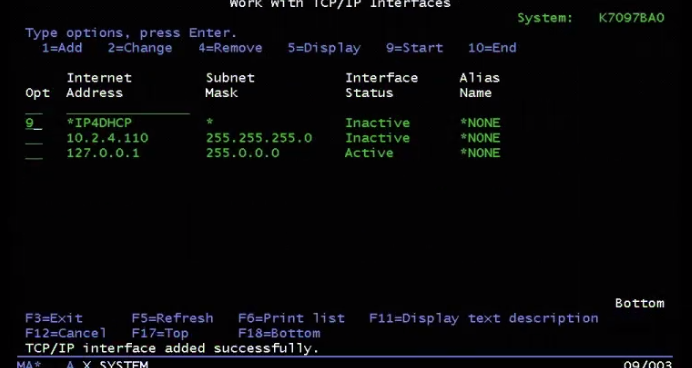
-
F5 to refresh
-
F3 twice to go back to the main console screen
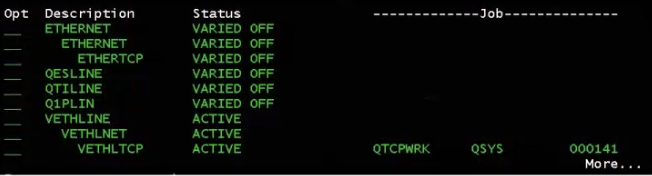
On Work with Configuration Status Screen
VARY OFF any other VETHLINE
6.4 Normal IPL
-
PRDWNSYS *IMMED to power system down
-
Bring system back up with a normal IPL
-
Choose Time Zone
-
Press enter through any errors- you will see some as we have not yet finished the restore. (We have only completed Option 22 restore, have yet to perform Option 23 restore to complete the full system restore).
-
Start subsystems manually STRSBS SBSD(QCTL), or CALL QSYS/QSTRUP
Step 7: Go Restore, Option 23 (on Target System)
-
If using FTP to transfer Option 23 backup to LPAR:
-
Make sure the Ethline is Varied ON and IP is Active
-
STRTCPSVR *FTP to start the FTP server
-
FTP the files from FTP Server IP Address
-
-
Create virtual tape image catalog
-
From the command line type CRTIMGCLG
-
Name your image catalog
-
Name your directory that the image catalog will be located in
-
Image catalog type is *TAP
-
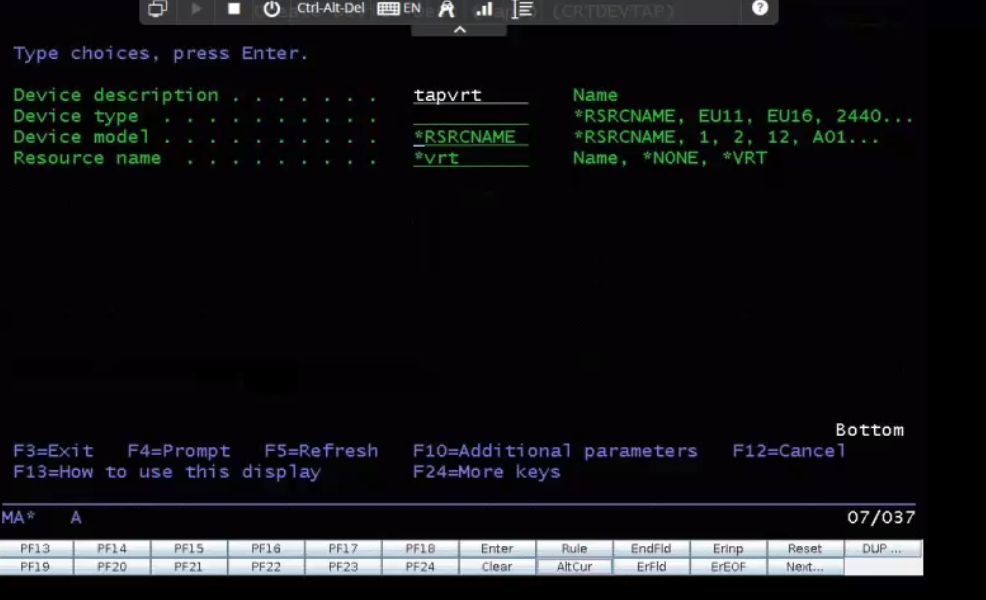
- CRTDEVTAP as shown in below screen shot:
-
WRKCFGSTS - *DEV
-
1 to VARY ON ‘TAPVRT’ (the virtual tape device you created)
-
Add virtual tape(s) to image catalog in directory above
-
Load image catalog to virtual tape drive
-
WRKIMGCLG
-
Option 8 to load IMGCATALOG (the name of your image catalog) with TAPVRT (the virtual tape device )
-
-
GO Restore Option 23 from virtual tape image catalog above
-
type GO RESTORE 23 – All user data
-
Subsystems will be ended, restore process will begin
-
-
Choose virtual tape device, and other parameters as below:
-
Check for job log once the restore is completed using DSPJOBLOG
-
Save the job log using DSPJOBLOG Output(*Print)
-
Restore any not saved object
-
Data Restoration is complete at this point
-
Check PTF status (WRKPTFGRP) and change the system values as required (WRKSYSVAL)
-
Check the job log from the restoration to ensure the restoration was completed successfully:
-
WRKJOBLOG
-
Select the Job Log for the restore with Option 5, to read through. Can also search through the logs for “Restore Not Completed” to target any issues listed in the logs.
-
-
Take a normal IPL to bring the system up gracefully.
- Change system name using CHGNETA
Next Steps
Main Overview
Operational Excellence
Resiliency
Kyndryl Cloud Uplift Resiliency Pillar
Migration Solutions
Design
Security