Importing Power LPARs into Kyndryl Cloud Uplift with PowerVC - A field enablement guide
Table of Contents
Key Takeaways
This guide describes how to use PowerVC to export a Power LPAR for import into Kyndryl Cloud Uplift. To learn more about PowerVC, see the Additional resources section.
Overview of using PowerVC for export
High-level process description
IBM Power^®^ Virtualization Center is built on OpenStack technology. It’s an advanced enterprise virtualization management offering for IBM Power Systems. PowerVC is available in Standard Edition, or Cloud PowerVC Manager edition.
IBM Cloud PowerVC Manager, an Infrastructure-as-a-service (IaaS) offering, provides a self-service cloud portal for IBM Power Systems via OpenStack. OpenStack is a collection of open-source software projects that enterprises or service providers can use to set up and run their cloud compute and storage infrastructure.

Traditional Setup vs PowerVC coexistence
The sections below explain how to install and configure IBM PowerVC Standard Edition and IBM Cloud PowerVC Manager, in an environment with HMC (Hardware Management Console) and NovaLink. IBM PowerVC provides the ability to perform virtual image capture and can take a snapshot of a VM and export it as an OVA. Once this is done, Kyndryl Cloud Uplift can recognize the OVA and import the LPAR using our existing import process.
The VIOS is part of the PowerVM^®^ Editions hardware feature. The VIOS is software that is in a logical partition. This software facilitates the sharing of physical I/O resources between client logical partitions within the server. The VIOS provides virtual SCSI target, virtual Fibre Channel, Shared Ethernet Adapter, and PowerVM Active Memory™ Sharing capability to client logical partitions within the system. The VIOS also provides the Suspend/Resume and remote restart features to AIX^®^, IBM^®^ i, and Linux client logical partitions within the system.
It is a software interface that is used for virtualization management. You can install PowerVM NovaLink on a PowerVM server. PowerVM NovaLink enables highly scalable modern cloud management and deployment of critical enterprise workloads. You can use PowerVM NovaLink to provision large numbers of VMs on PowerVM servers quickly and at a reduced cost.
The Hardware Management Console (HMC) is a hardware appliance that you can use to configure and control one or more managed systems. You can use the HMC to create and manage logical partitions and activate Capacity Upgrade on Demand. Using service applications, the HMC communicates with managed systems to detect, consolidate, and send information to service and support for analysis.
The HMC also provides terminal emulation for the logical partitions on your managed system. You can connect to logical partitions from the HMC itself, or you can set up the HMC so that you can connect to logical partitions remotely through the HMC.
Note: When a server is co-managed by the HMC and PowerVM NovaLink, and PowerVM NovaLink is in master mode, you can run partition-change operations only by using PowerVM NovaLink. If you want to run partition change operations by using the HMC, you must set the HMC to master mode.
Back to the Top
Preparing for PowerVC
This section describes the following:
-
Identifying the various components involved in planning for the deployment of IBM PowerVC.
-
Recognizing hardware requirements for deploying IBM PowerVC Standard or Cloud Manager.
-
Identifying properties in planning for IBM Cloud PowerVC Manager.
The PowerVC architecture supports a single management host for each managed domain. It is not possible to configure redundant PowerVC management hosts that control the same objects.
The VMs that host the PowerVC management host must be dedicated solely to this function. Only monitoring agents, data collection tools for audit or security, or other software that manages the VM itself can be installed; no other software or application can be installed on this VM.
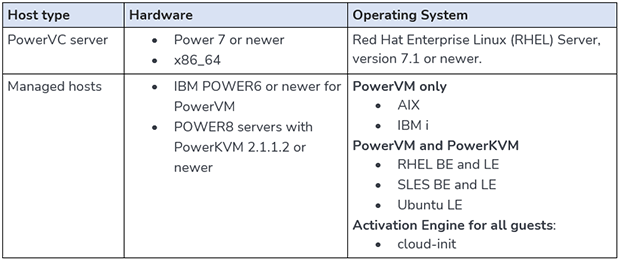
The supported operating systems for running PowerVC are as follows:
Link to IBM documentation: https://www.ibm.com/support/knowledgecenter/SSVSPA_1.4.4/com.ibm.powervc.cloud.help.doc/powervc_hwandsw_reqs_cloud.html#powervc_hwandsw_reqs_cloud__d718e641
-
Red Hat Enterprise Linux (RHEL) version 7.1 or later for IBM Power for ppc64 and ppc64le
-
RHEL Server, and version 7.1 or later for x86_64
-
RHEL Server, and version 7.2 and later (BE/LE)
These guest operating systems are supported for deployment:
-
PowerVM and PowerKVM:
-
RHEL 5.9, 5.10, 6.4, 6.5, 6.6, 7.0, and 7.1 (little endian)
-
SUSE Linux Enterprise Server (SLES), version 11SP3 and SP4
-
SLES version 12 (little endian)
-
Ubuntu 14.04.1 or later
-
-
PowerVM only:
-
IBM AIX 6.1 and 7.1
-
IBM i 7.1 and 7.2
-
Hardware requirements
Minimum resource requirements
| Number of VMs | Min. | 1–400 | 401–1000 | 1001–2000 | 2001–3000 | 3001–5000 |
|---|---|---|---|---|---|---|
| Processor capacity | 1 | 2 | 4 | 8 | 8 | 12 |
| Virtual CPUs | 2 | 2 | 4 | 8 | 8 | 12 |
| Memory (GB) – HMC-managed systems | 10 | 10 | 12 | 20 | 28 | 44 |
| Swap space (GB) | 10 | 10 | 12 | 20 | 28 | 44 |
| Disk space (GB) | 40 | 40 | 60 | 80 | 100 | 140 |
Processor capacity depends on the type of host that is being used as the PowerVC management server.
-
If the PowerVC management server is PowerVM, Processor capacity refers to either the number of processor units of entitled capacity or the number of dedicated processors.
-
If the PowerVC management server is PowerKVM or x86, Processor capacity refers to the number of physical cores.
The installer has the following storage requirements:
-
/tmp – 250 MB
-
/usr – 250 MB
-
/opt – 2.5 GB
-
/home – 3 GB (minimum). We recommend that 20% of the space is assigned to /home.
Examples: For 400 virtual machines, 8 GB is recommended. For 1000 virtual machines, 20 GB is recommended. For 2000 virtual machines, 30 GB is recommended. -
The remaining space is used for /var and swap space.
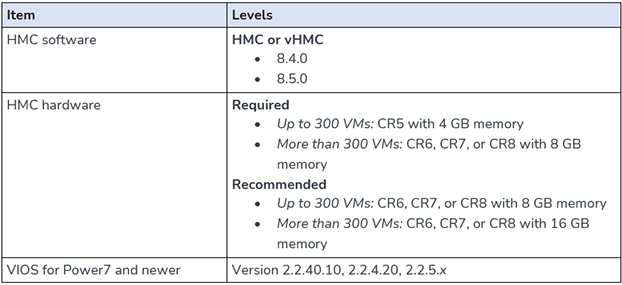
Note: We recommend that you install all updates for HMC.
If you plan to manage NovaLink:
-
PowerVC version 1.3.1 or later is required to manage a PowerVM NovaLink host with PowerVC.
-
Hardware Management Console (HMC):
- HMC V8R840 SP1 or later is required to co-manage a system with PowerVM NovaLink.
Ports used by PowerVC for inbound and outbound traffic
PowerVC implements several services. Each service has an assigned port number. The link below shows the ports used by PowerVC for inbound and outbound traffic, depending on the installed version.
Ports used by IBM PowerVC: https://www.ibm.com/support/knowledgecenter/SSVSPA_1.4.4/com.ibm.powervc.cloud.help.doc/powervc_planning_security_firewall_cloud.html
Planning for security
-
PowerVC provides security services that support a secure environment.
-
Security services include:
-
LDAP support for authentication and authorization information (users and groups).
-
Apache HTTPd configured as the web server provides HTTPS support for managing virtual hosts.
-
Host key and certificate verification of hosts, storage, and switches.
-
Commands to encrypt and decrypt passwords, tokens, audit records, and other persisted strings.
-
Audit logs are recorded and available.
-
Planning for performance
PowerVC should be the only application in the LPAR.
-
PowerVC can generally coexist with other software on the same instance, assuming that there are no conflicts, such as port contention, user namespace, file system capacity, or firewall settings.
-
PowerVC resource requirements are sized assuming that PowerVC is the only workload that is running on the management instance:
- If other applications are using resources, adjust the sizing accordingly.
Database – IBM Cloud PowerVC Manager uses MariaDB as the default database
Images in IBM Cloud PowerVC Manager
-
An image contains applications and all their dependencies (operating system, third-party libraries, configurations, etc.).
-
IBM Cloud PowerVC Manager enables administrators and users to capture, restore snapshots, and deploy virtual appliances (provisioning).
Back to the Top
IBM PowerVC installation, upgrade, and configuration
This section provides a quick overview of IBM Cloud PowerVC Manager and shows the procedure to implement it. IBM Cloud PowerVC Manager can be installed on Red Hat Enterprise Linux (RHEL) version 7.1 or later, either on the ppc64, ppc64le, or x86_64 platforms.
Unlike the Hardware Management Console (HMC), PowerVC is not a standalone appliance. It must be installed on an operating system. On Power hardware, both RHEL 7.1 little-endian and RHEL 7.1 big-endian are supported. The general trend is moving toward little-endian. You must have a valid Linux license to use the operating system and a valid license to use PowerVC.
IBM PowerVC: Installation steps
-
Verify hardware and software prerequisites.
-
Install the supported version and fixes for Red Hat Enterprise Linux Server.
-
Obtain the IBM PowerVC software. Use either:
-
Local media.
-
Download (you need an IBM ID to download).
-
-
Extract the tar file.
-
Define network interface (optional: the default network interface is eth0).
-
Create a media repository.
-
Start the installation process.
-
Review installation logs.
Downloading the software
-
Open a web browser and navigate to the Entitled Software Support website:
-
Sign in with your IBM ID:
-
Select Software downloads.
-
Select the Power (AIX) brand,
-
Select the customer number that you want to work with, and then click Continue.
-
Under 5692-A6P, select the edition of PowerVC that you purchased, and then click Continue.
-
Choose to download either the PPC64, PPC64LE or the x86_64 tar file.
Link to Sign in: https://www.ibm.com/servers/eserver/ess/OpenServlet.wss
Installing the software
Installing IBM Power Virtualization Center from download
Extracting the tar image to an installation directory:
mkdir <installer location>
cd <installer location>
tar --xvf <dvd_mount_point> powervc-install-ppc-rhel-1.3.3.0.tgz
Installing IBM Power Virtualization Center from media
Mounting the DVD and extracting the installer media
mount /dev/dvd <dvd_mount_point>
mkdir <installer location>
cd <installer location>
tar --xvf <download_location> powervc-install-ppc-rhel-1.3.3.0.tgz
mount --o loop <iso image> <iso_image_mnt_point>
mkdir <installer location>
cd <installer location>
tar --xvf <iso_image_mnt_point> powervc-install-ppc-rhel-1.3.3.0.tgz <installer location>
Defining the network interface
By default, the installation process uses the eth0 network interface. To use a different network interface, set the environment variable HOST_INTERFACE before running the install script: #export HOST_INTERFACE=eth1.
RHEL media repository
-
The installation process relies on the use of a YUM image repository for the Red Hat Enterprise Linux installation media.
-
Typically, this is created during the installation process of RHEL.
Creating a media repository
Example repository creation:
- Create the directory where the ISO image is mounted:
mkdir -p /media/iso - Mount the Red Hat Enterprise Linux Server, version 7.3 ISO image:
mount -o loop /path/to/rhel.iso /media/iso - Create a repo file that points to the Red Hat Enterprise Linux repo file on the ISO image.
Example repo file:
/etc/yum.repos.d/rhel73-media.repo\[rhel73media]\
name=RHEL 7.3
media baseurl=file:///media/iso\
enabled=1
gpgcheck=0
- Verify that YUM is seeing the new repo file
yum repolistInstallation script
-
A script named install drives the installation:
-
Performs prerequisite checks.
-
Verifies YUM repository.
-
Installs and configures OpenStack packages and database.
-
Installs and configures PowerVC.
-
-
Installation locations:
-
/opt/ibm/powervc – PowerVC and database files
-
/opt/ibm/ego – IBM Platform Resource Scheduler files
-
/opt/ibm/ttv-validation – Validation
-
/usr/lib/python2.6 – OSEE and PowerVC additions
-
/usr/bin – OpenStack files
-
- Log file:/opt/ibm/powervc/log/powervc_install_<timestamp>.log
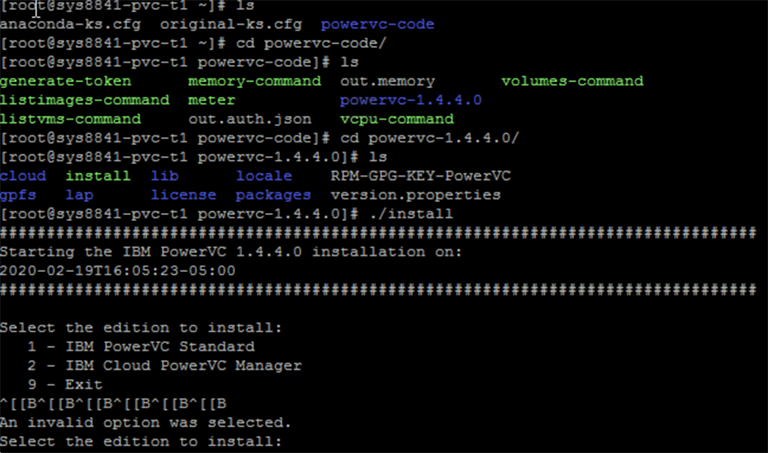
PowerVCinstall: The file location of Install script
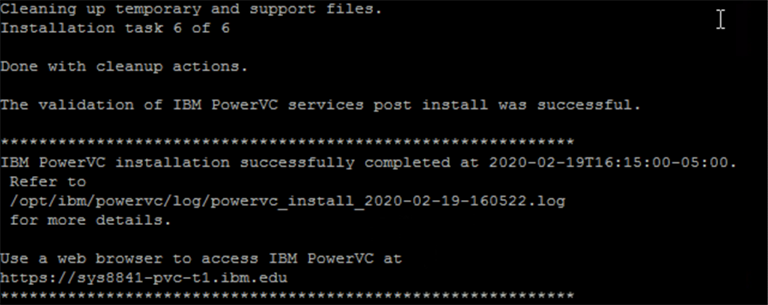
PowerVC installation completed successfully
PowerVC login URL
Log in with the URL provided from the command line after the installation completes and use the same credentials used for logging into HMAC.
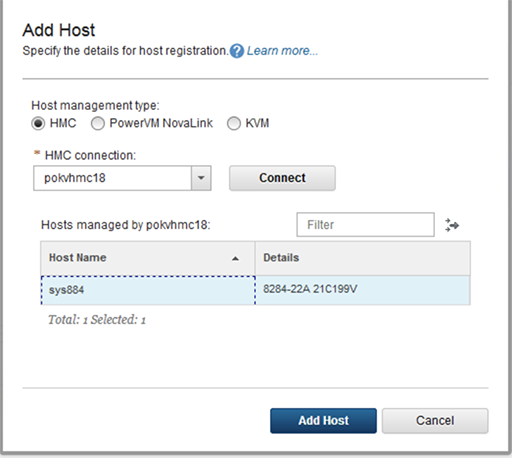
The first step when adding a host is to run the Add Host task. For PowerVC Standard Edition managing PowerVM, you must provide the HMC’s information and connect to it. PowerVC will then present a list of all the hosts being managed by that HMC. You can select the ones to add.
The image below shows the form to fill out to connect to a new HMC. The display name is the name that appears in the PowerVC application.
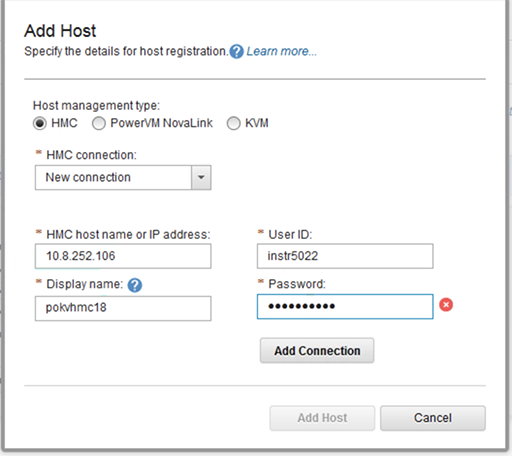
Adding HMC host to PowerVC
After providing the HMC login details, PowerVC will display all the hosts that the HMC manages. Select one or more of the hosts and click Add Host. When you add a host, PowerVC can manage VMs already created on that host.
Before you can start performing tasks in PowerVC, you must register the resources that you want to manage. You must register storage providers to allow PowerVC access and manage storage. However, PowerVC can discover Shared Storage Pools (SSPs) and register them automatically when connecting to the host.
Adding existing virtual machines
-
Click the host’s name to view host properties on the Hosts page:
- Lists configuration details about the server and VMs.
-
The Manage Existing virtual machines task lets you add existing VMs to be managed by PowerVC.
-
Add a virtual machine either from the Hosts panel or the Virtual Machines panel.
-
Click Manage Existing or Manage Existing Virtual Machines.
Tip: Adding existing VMs from a host is referred to as “onboarding” the VMs.
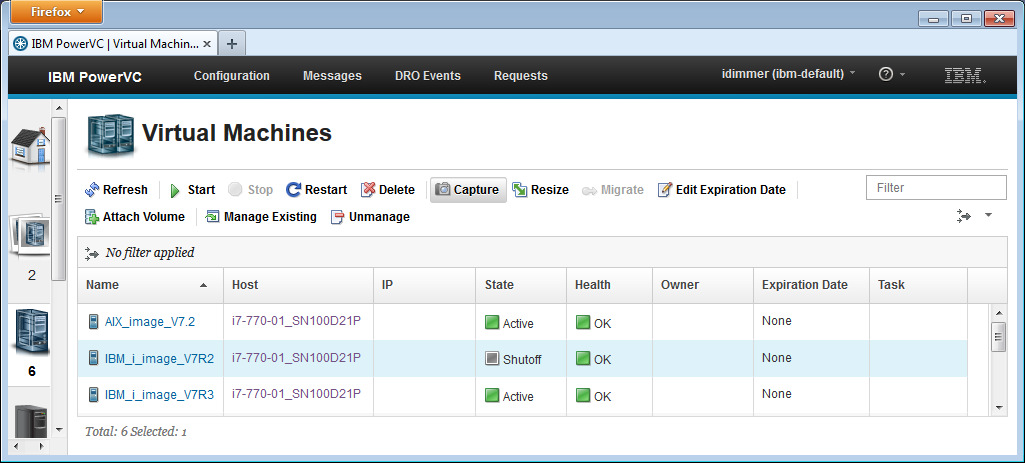
After a VM is added to PowerVC, you can perform operations from PowerVC. Although the PowerVC applications are automatically updated for configuration changes made on the HMC, be careful to avoid a situation in which some VMs are managed by PowerVC, and others are managed on the HMC.
If you remove a host, all its VMs are also removed.
The virtual machine managed through PowerVC can be stopped, started, restarted, deleted, captured, resized, and migrated.
Back to the Top
Capturing an LPAR Image and Exporting
One of the biggest advantages of having PowerVC is its ability to capture existing VMs as images within the image repository. You can capture a virtual machine that you created or deployed.
Before a virtual machine can be captured, it must meet specific requirements.
Virtual machine requirements for capture
-
Your PowerVC environment has a basic configuration.
-
An image that is not previously managed by PowerVC requires the capture of an existing virtual machine.
-
Manual set-up of a virtual machine on the HMC and VIOS.
-
The virtual machine uses virtual I/O and virtual storage.
-
-
The virtual machine must have an operating system that is supported by PowerVC.
-
If you plan to have your Linux virtual machine with multiple paths to storage (MPIO), you must configure Linux for MPIO on the root device.
-
The virtual machine must be powered off.
How to capture a virtual machine
-
Perform any pre-capture preparation that you want to do on the virtual machine, such as deleting or cleaning up log files, operating system customization, and any requirements for capture
-
Add the existing virtual machine to your PowerVC.
-
In PowerVC, select the virtual machine, and then click Capture.
When the virtual machine is captured, all volumes that belong to its boot set are included in the image.
Capturing a Virtual Machine
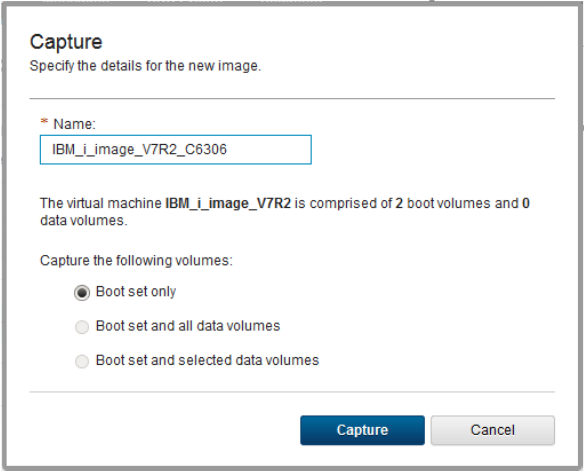
Capture volumes options
Note: We recommend that you select the Boot set and all data volumes option. Make sure you have enough storage space to capture the combined size of all volumes.
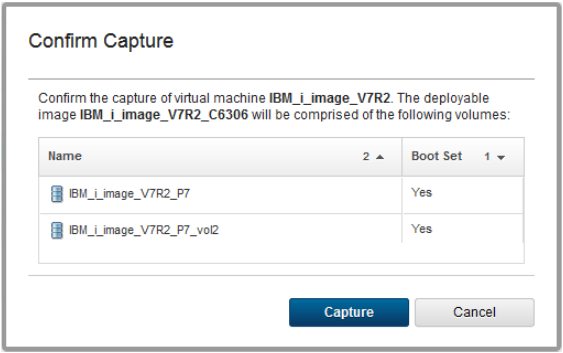
Capture confirmation
Captured Images
Click the Images icon to show the virtual images that are available. You can also view their properties, delete them, and do other tasks.
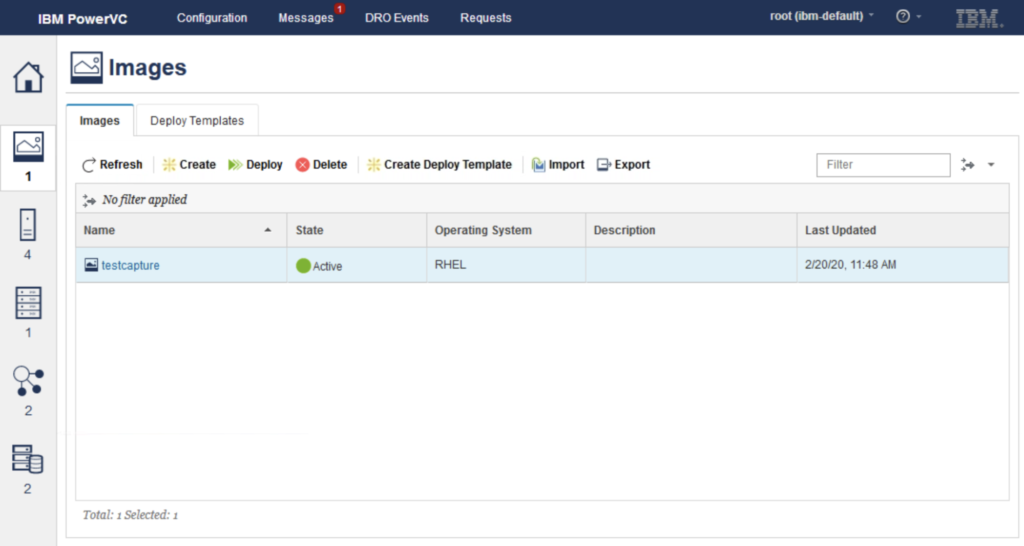
Each image has a status associated with it. If the status is Active, then the image is ready to be deployed. You can also click the Refresh button to update the status of the images.
Run the powervc-image list command as the root user to view the available images.
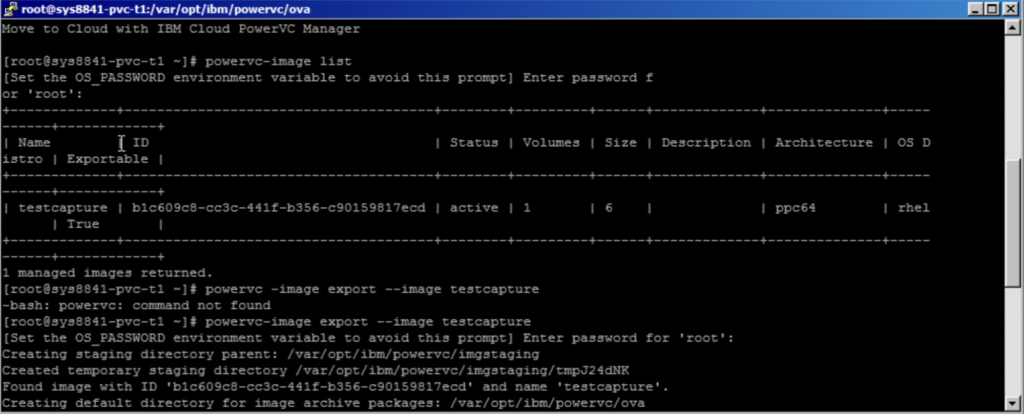
PowerVC export process
powervc-image export – Exports a deployable image from PowerVC to a local OVA. For example, to export an image named aix71 into compressed OVA format, run the following command:
powervc-image export \--image aix71
The link below explains in detail on how to export an image, depending on the PowerVC version used: https://www.ibm.com/docs/en/powervc-cloud/2.1.0?topic=images-exporting-importing
Back to the Top
Uninstalling PowerVC
- To remove PowerVC from the management host, run the powervc-uninstall command.
/opt/ibm/powervc/bin/powervc-uninstall -h
Notes:
-
Uninstallation doesn’t remove anything in the environment that is managed by PowerVC.
-
Objects that were created with PowerVC (virtual machine, volumes, etc.) are left unchanged.
-
Any Red Hat Enterprise Linux prerequisite packages that are installed during the PowerVC installation remain installed.
-
-
The uninstallation process writes its log here:
/var/log/powervc-uninstall.logfile
If you encounter issues when you run the powervc-uninstall command, you can clean up the environment by using the following command:
<powervc_install_file_folder>/powervc-uninstall --f
This command forces the uninstallation of all components of PowerVC.
You can find more information here: https://www.ibm.com/support/knowledgecenter/en/SSXK2N_1.4.4/com.ibm.powervc.standard.help.doc/powervc_uninstalling_hmc.html
Back to the Top
Importing to Kyndryl Cloud Uplift
Importing VMs using the VM Imports page – This help article describes how to import power VMs with the Kyndryl Cloud Uplift import tool: https://cloud.skytap.com/imports.
Back to the Top
Additional Resources & FAQ
Q: Do IBM PowerVC Standard Edition and IBM Cloud PowerVC Manager both can export images?
A: Both can export images. For more information, see: https://www.ibm.com/docs/en/powervc-cloud/2.1.0?topic=images-exporting-importing
Q: What is the limitation to the size of LPAR export?
A: The available local storage capacity must be at least twice the combined size of the volumes you plan to export.
Q: How can I be sure that PowerVC is completely removed after export is done?
A: This command forces the uninstallation of all components of PowerVC:
<powervc_install_file_folder>/powervc-uninstall --f
Q: Does this work have any impact on my daily operations?
A: No, this won’t have any impact on the LPAR, apart from shutting down the LPAR.
Q: How do I export and move LPARs that are larger than 30TB into Kyndryl Cloud Uplift?
A: The available local storage capacity must be at least twice the combined size of the volumes you plan to export.
Q: How long does the export process take?
A: Export rate is about 10 MB per second.
Q: Are exports done sequentially or in parallel?
A: Exports are sequential.
Back to the Top
Additional resources
Back to the Top
Next steps
Main Overview
Operational Excellence
Resiliency
Kyndryl Cloud Uplift Resiliency Pillar
Migration Solutions
Design
Security