IBM i workload migration from on-premises to Kyndryl Cloud Uplift using BRMS ICC
This guide is provided “as-is”. Information and views expressed in this document, including URL and other Internet website references, may change without notice and usage of the included material assumes this risk.
This document does not provide you with any legal rights to any intellectual property in any product. You may copy and use this document for your internal, reference purposes.
Table of Contents
- Key takeaways
- Before you begin
- Full system backup of IBM i source using BRMS ICC
- Create ICC FTP resource
- Run the primary backup from console
- Run the second backup from console
- Change BRMS Control Group QCLDBIPL01
- Transfer backup media to ICC FTP resource
- Generate BRMS recovery report
- Copy backup media from ICC FTP resource to IBM i LPAR on cloud
- IBM i recovery from IBM i NFS server
- Configure IBM i client server (target LPAR)
- Set System date, time, and time zone same as current [Source System]
- Recover the BRMS libraries on target system
Key Takeaways
Here are key takeaways for developers and operators to consider from this guide:
- Demonstrate how an IBM i workload can be migrated to Kyndryl Cloud Uplift on Azure using BRMS ICC. In this document you will learn how to take backup on IBM i using BRMS ICC and transfer it to cloud using FTP.
- Full-system recovery in the cloud using IBM i as NFS server to an IBM i VM as target system.
Before you begin
The below LPPs need to be installed on IBM i LPAR:
- 5770-SS1 Option 18: Media and Storage Extensions
- 5770-SS1 Option 44: Encrypted Backup Enablement (Optional)
- 5770-BR1 *BASE
- 5770-BR1 Option 1: Network feature (Optional)
- 5770-BR1 Option 2: Advanced Functions feature (Optional)
- 5733ICC *BASE IBM Cloud Storage Solutions for i
- 5733ICC Option 1: Cloud Storage
- 5733ICC Option 2: Advanced
- 5733ICC Option 3: Reserved – Option 3,4,5,6,7\
-
Install latest PTFs on IBM i with below individual PTFs installed
- Minimum PTF level for IBM i
- Utilized ASP should be less than 48% in IBM i LPAR
Back to the Top
Full system backup of IBM i source using BRMS ICC
Create ICC FTP resource
Create ICC FTP resource where IBM i backup will be transferred. FTP resource can be IBM i or Linux system. For this document, we will be using Linux in our examples.
In the case of large data, it is recommended to use Linux system On-Prem and transfer the data to Linux system on cloud using AZCopy.
NOTE: If you have 5 disk arms on-prem with xyz storage, then re-create that setup in your Kyndryl Cloud Uplift LPAR.
- Create FTP resource using the below command:
===> CRTFPRICC
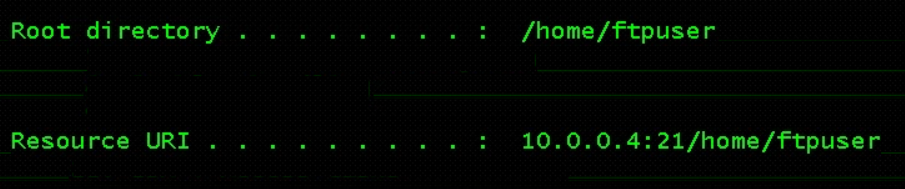
The root directory is the directory in the FTP server where we want to transfer the data and the resource URI will be IP of FTP server.
Example: <FTP server IP>:<port number>./<root directory>
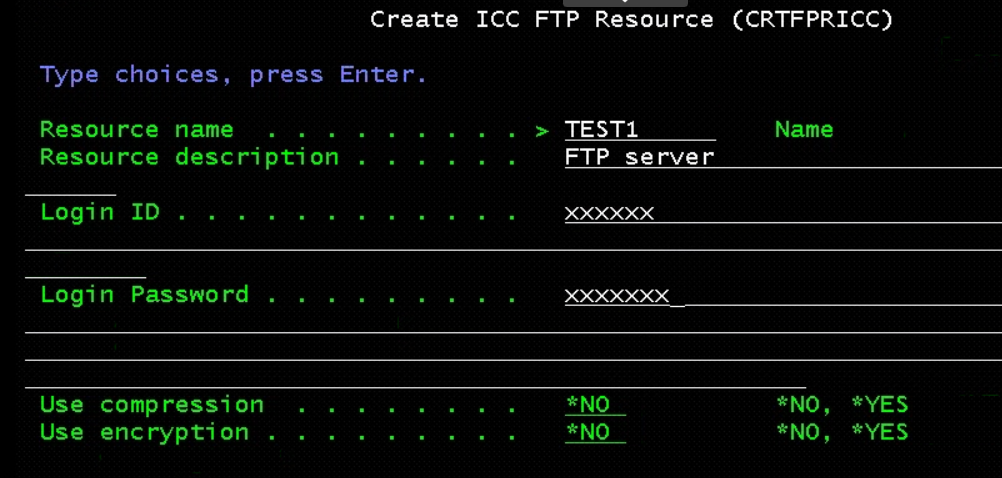
Once completed, you should see: “Resource “TEST1” was created for resource type FTP”.
Back to the Top
Create the backup control groups
- Once the resource is created, run the following command:
===> INZBRM \*DATA\
Once you press <ENTER> wait for the command to complete, there is no confirmation message that is displayed. This command will automatically create the below control groups for the Test1 resource created in the previous step.
- QCLDBGRP01
- QCLDBIPL01
- QCLDBSYS01
- QCLDBUSR01
- Put the system in restricted state using the below command:
===> ENDSBS \*ALL \*IMMED\
Wait for the message: “System ended to restricted condition.”
or use command:
===> WRKSBS
And refresh until you see it has completed.
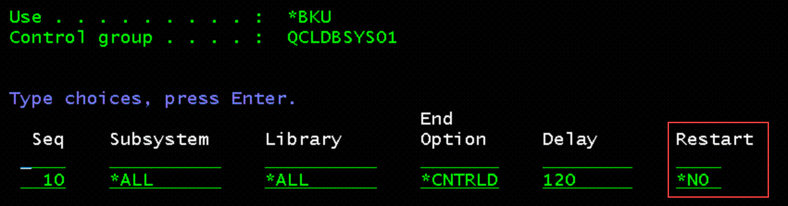
- Change subsystems to process for Control Group QCLDBSYS01 using the following commands:
===> WRKCTLGBRM - Take Option 9 in front of QCLDBSYS01.
- Enter the values matching the screen below, make sure to put “*NO" for restart.
- Press <ENTER> once you have all the values filled in.
- Press F3 to exit.
- Change Restart to “*NO for Seq 10 Subsystem *ALL”.
Back to the Top
Run the primary backup from console
- Start backup using below command:
===> STRBKUBRM CTLGRP(QCLDBSYS01) SBMJOB(\*NO)** - Check for error messages once the backup is complete.
NOTE: You will see messages similar to: “1 of 120 libraries processed….84 objects saved.”
NOTE: The backup will take a while to complete.
NOTE: This first backup command will save USER data to virtual tape.
NOTE: When the processing is finished you will see a message similar to: “Control group QCLDBSYS01 type *BKU processing is complete.”
Back to the Top
Change BRMS Control Group QCLDBIPL01
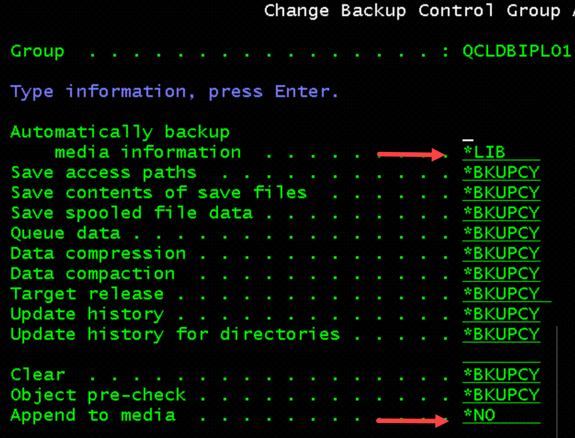
- Change BRMS Control Group QCLDBIPL01 using command:
===\> **WRKCTLGBRM\ - Select QCLDBIPL01
- Select Option 8=Change attributes
- Page down once, change Automatically backup media information to *LIB
- Append to media to *NO.\
- Select Option 9=Subsystems to process
- Change Restart to *YES for Seq 10 Subsystem *ALL \
Back to the Top
Run the second backup from console
- Run the second backup from console:
===> STRBKUBRM CTLGRP(QCLDBIPL01) SBMJOB(\*NO)\
NOTE: The second backup command saves SYSTEM DATA to optical media.
You should see a message similar to: "STRTCP Started for QSECOFR…."
NOTE: QCLDBIPL01 and QCLDBSYS01 control groups are used for entire system backup, and QCLDBUSR01 and QCLDBGRP01 are used for incremental backups.
- Once the backups are complete check for the media using command:
===> WRKMEDBRM. - Take Option 6 in front of any one of them. This will show the medias used for backup and the order as well in which they are needed to add them in the catalog in the NFS server.
Back to the Top
Transfer backup media to ICC FTP resource
- Start FTP server using command:
===> STRTCPSVR \*FTP\
It may be already started, output will be: "FTP Server Starting"
- Start QICC subsystem using command:
===> STRSBS QICC/QICCSBS - Move the media to FTP resource using command:
===> WRKMEDBRM - Find all the media objects that have the "+" (plus sign) next to them. They should end with "OPT" and "TAP.
- Put an "8" (move) next to all of them with the plus sign.
You might have to page down to find all of them.
- Press <ENTER> after putting 8 next to each entry.
You should see a screen similar to this:
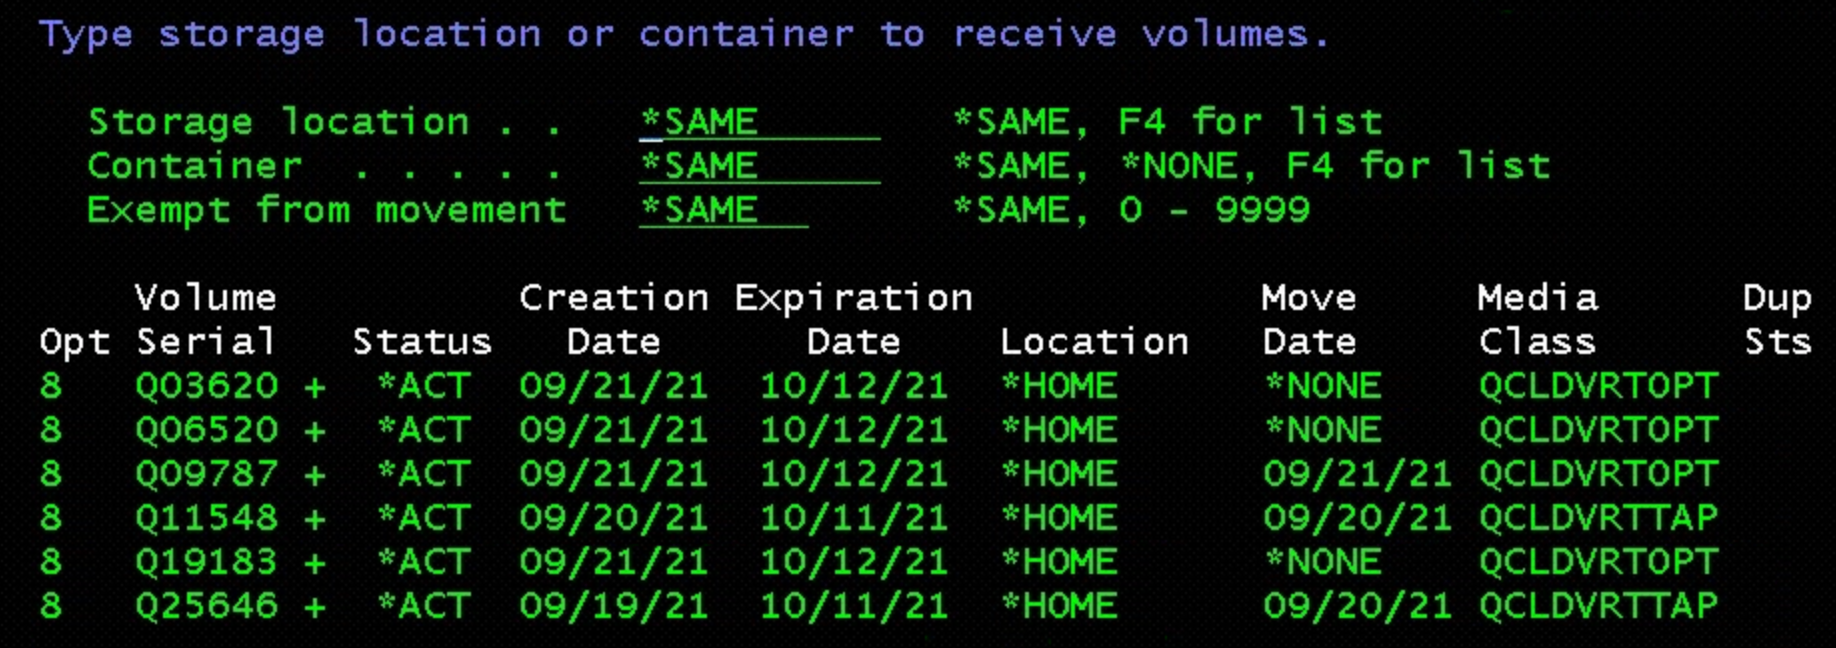
- Change "Storage location" to "TEST1" that was created earlier:

- And press <ENTER>
NOTE: QCLDBIPL01 will use virtual optical media and QCLDBSYS01 will use virtual tape media.
- After moving the media, check the status of the transfer using the below command:
===> WRKSTSICC Status(\*All)
You will see the Volume Name, Status, and Complete % for each file transfer. Wait until all Volumes have Successfully been completed to proceed to the next step.
Back to the Top
Generate BRMS recovery report
- Generate BRMS recovery report using below command:
===> **STRRCYBRM OPTION(\*CTLGRP) ACTION(\*REPORT) CTLGRP((QCLDBSYS01 1)(QCLDBIPL01 2))**
Back to the Top
Copy backup media from ICC FTP resource to IBM i LPAR on cloud
(This step can be skipped if backup is being transferred to IBM i server in 4^th^ step)
This IBM i LPAR will be used as NFS server to build the target IBM i LPAR
- Create a directory in IFS where you want to copy the media from FTP server using the below command:
MKDIR '/XX', where xx is the directory name
- Start FTP server and QICC subsystem if not already started using the below commands:
STRTCPSVR \*FTPSTRSBS QICC/QICCSBS - Copy the media from FTP server to IBM i LPAR using the below command, where LOCALFILE will be the directory created in previous step/media volume name and CLOUDFILE will be the file name FTP server with syntax QBRMS_xx.
CPYFRMCLD RESOURCE(Test) Async(\*No) CLOUDFILE(\'QBRMS\_IBMI74/QO3911\')LOCALFILE(\"/xx/QO3911\')Back to the Top
IBM i recovery from IBM i NFS server
- Create image catalog and add media entry to image catalog using
below commands in IBM i NFS server:
> CRTDEVOPT DEVD(INSTALL) RSRCNAME(\*VRT) - VARY ON the Optical drive
> CRTIMGCLG IMGCLG(XXX) DIR(\'/XX\') TYPE(\*OPT) CRTDIR(\*YES)> ADDIMGCLGE IMGCLG(XXX) FROMFILE('media name') TOFILE('media name') -
Load image catalog to Optical drive
-
Verify image catalog with verify type as *LIC and NFSSHR as *YES
- Start the NFS server and change NFS export options using below
commands:
> STRNFSSVR SERVER(\*All)> CHGNFSEXP OPTIONS('-i -o ro') DIR('/xx)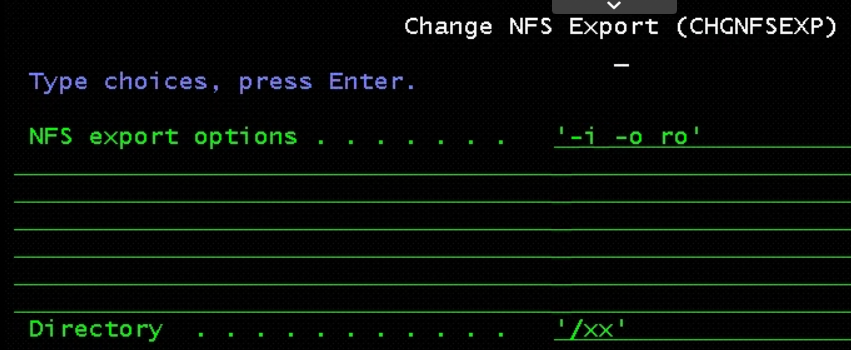
- Change object authorities and TFTP attributes:
> CHGAUT OBJ(\'/xx\') USER(\*PUBLIC) DTAAUT(\*RWX) SUBTREE(\*ALL)
> CHGTFTPA AUTOSTART(\*YES) ALTSRCDIR(\'/xx\')
> CHGAUT OBJ(\'/xx\') USER(QTFTP) DTAAUT(\*RX) SUBTREE(\*ALL)
- Restart the TFTP server:
> ENDTCPSVR SERVER(\*TFTP)> STRTCPSVR SERVER(\*TFTP)Back to the Top
Configure IBM i client server (target LPAR)
-
Login to SST and select Option 8 – Work with service tools User IDs and Devices
- Press F13 and select the LAN adapter
NOTE: The LAN adapter needs to be on the same VLAN as IBM i NFS server
- Configure service tools LAN adapter:
- IP version allowed = IPV4
- Internet address = you can use the same IP of the client (TARGET)
- Gateway router address = use the same gateway on the client
- Subnet mask = use the same
- Press F7=Store
- Press F13=Deactivate
- Press F14=Activate
-
Verify port 3000 status as active using NETSTAT *CNN and use F14 to display port numbers
- Create client server optical device
- CRTDEVOPT, Press F4 to prompt
- Local internet address = *SRVLAN
- Remote internet address = the IP address of the IBM i VSI NFS Server
- Network image directory = ‘/xx’
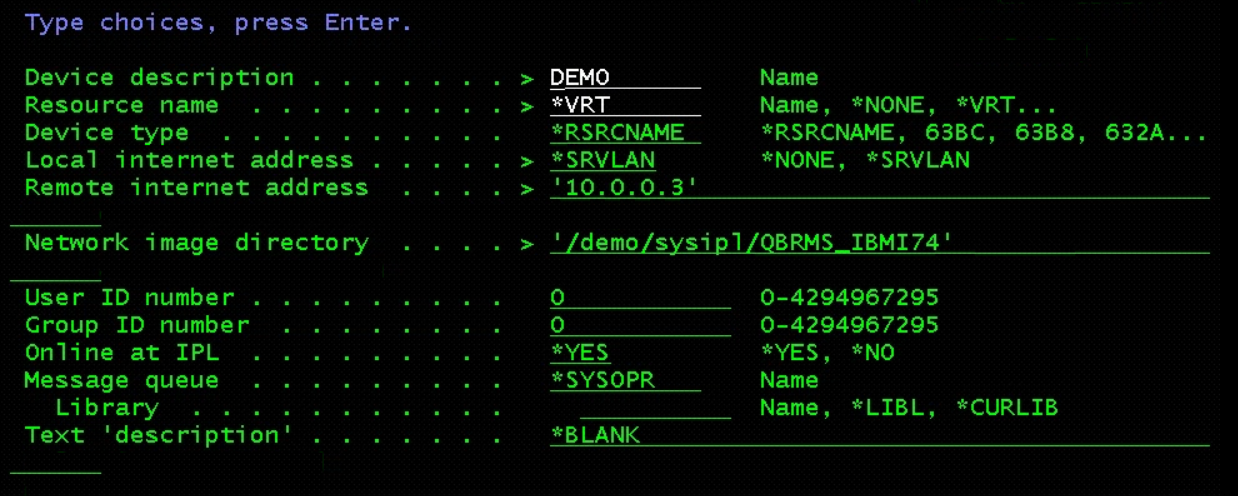
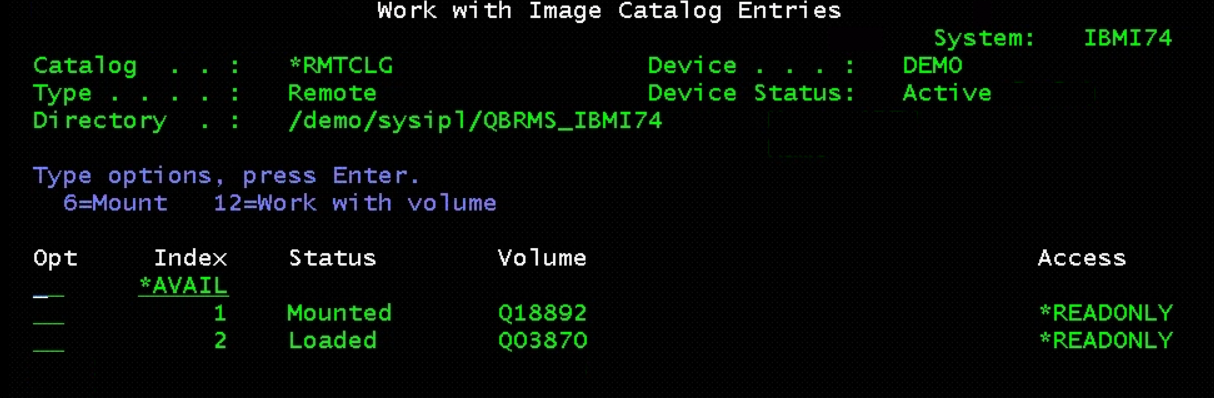
- Vary on the optical device created in previous step and verify you can access the remote image catalog using WRKIMGCLGE IMGCLG(*DEV) DEV(Opt dev)
-
Start network install to begin scratch installation starting from LIC installation. Prior to installation, make sure to document all current network information, same may be needed after restoration.
-
Start network install:
- STRNETINS press F4 to prompt
- Network optical device = Optical Device
- Installation option = *LIC
- Keylock mode = MANUAL
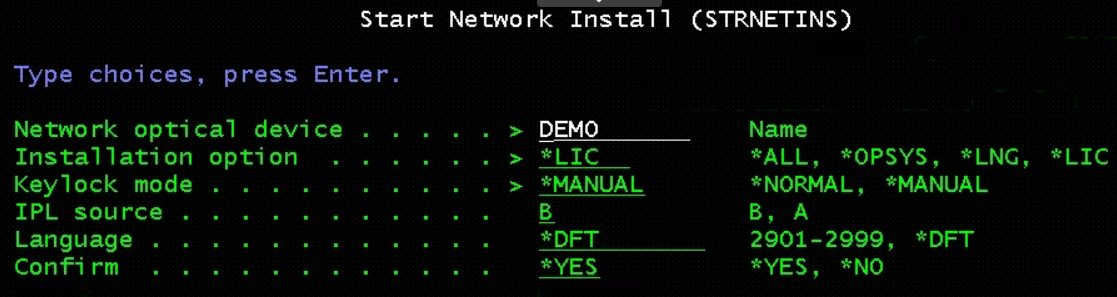
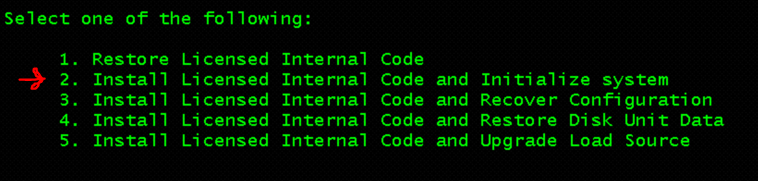
- On Install LIC screen, take Option 2 to Install LIC and Initialize system
-
Post LIC installation, do disk configuration
-
Initialize non configured disks and add to ASP
-
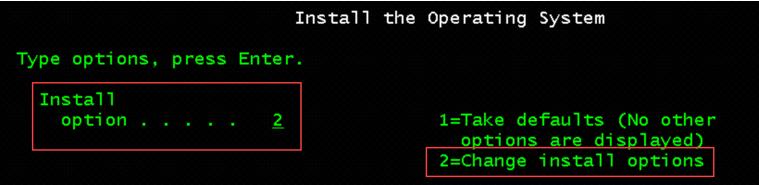
Install OS using below option:
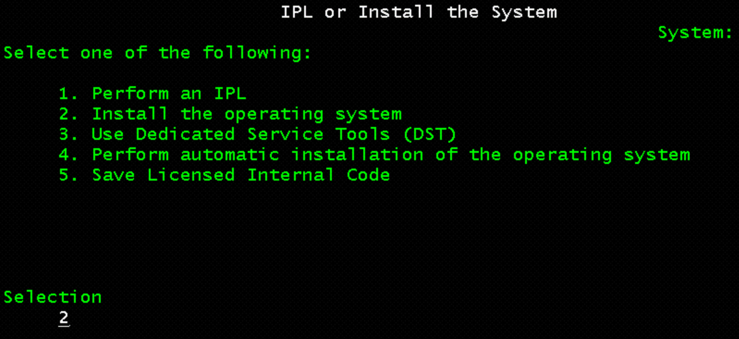
-
On Install device type, Select Option-2 – Network device
- Configure the network device:
- Server IP = the IP address of the SOURCE NFS IBM i VSI
- Path Name = the name of the Directory where the image volumes are located
- Press F10 = Continue
- Press Enter twice to confirm and on Install the OS screen, take Install Option as 2
-
Select Option 1=Restore programs and language objects from the current media set
-
Select Option 2=Keep for Job and output queues
-
Select Option 1=Yes for distribute operating system and on available disk units
-
Change system information – 1 to restore
- Change following on next screen:
- Start print writers = N
- Start system to restricted state = Y
- Set major system options = Y
- Define or change system at IPL = Y
Back to the Top
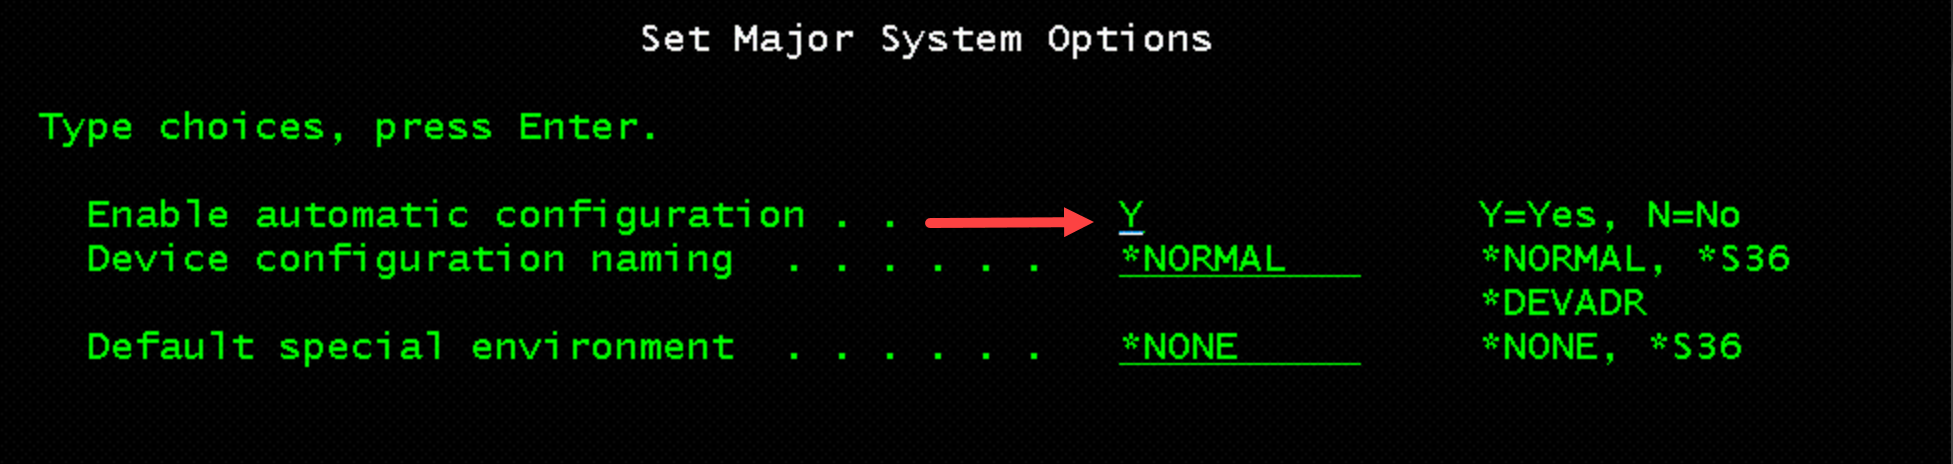
Set System date, time, and time zone same as current [Source System]
- Enable automatic configuration – Y
- Select Option 3 twice to change the following system values:
>  QALWOBJRST \_\_\_\_\_\_\_\_\_\_\_\_\_\_\_ \*ALL

>   QFRCCVNRST \_\_\_\_\_\_\_\_\_\_\_\_\_\_\_ 0

>   QINACTITV \_\_\_\_\_\_\_\_\_\_\_\_\_\_\_ \*NONE

>   QJOBMSGQFL \_\_\_\_\_\_\_\_\_\_\_\_\_\_\_ \*PRTWRAP

>   QJOBMSGQMX \_\_\_\_\_\_\_\_\_\_\_\_\_\_\_ 30
(30 minimum, 64 recommended)
> QLMTDEVSSN \_\_\_\_\_\_\_\_\_\_\_\_\_\_\_ 0

>   QLMTSECOFR \_\_\_\_\_\_\_\_\_\_\_\_\_\_\_ 0

>   QMAXSIGN \_\_\_\_\_\_\_\_\_\_\_\_\_\_\_ \*NOMAX

>   QPFRADJ \_\_\_\_\_\_\_\_\_\_\_\_\_\_\_ 2

>   QPWDEXPITV \_\_\_\_\_\_\_\_\_\_\_\_\_\_\_ \*NOMAX

>   QSCANFSCTL \_\_\_\_\_\_\_\_\_\_\_\_\_\_\_ \*NOPOSTRST

>   QVFYOBJRST \_\_\_\_\_\_\_\_\_\_\_\_\_\_\_ 1
- Press F3 twice and change the QSECOFR password.
NOTE: The current QSECOFR password will be QSECOFR (capital letters)
Back to the Top
Recover the BRMS libraries on target system
- CRTDEVOPT, Press F4
- Local internet address = *SRVLAN
- Remote internet address = the ip address of the IBM i NFS Server
- Network image directory = ‘/xx’
- Vary ON the device
- Verify you can access the image catalog:
```
WRKIMGCLGE IMGCLG(*DEV) DEV(INSTALL)
CHGMSGQ MSGQ(QSYSOPR) DLVRY(*NOTIFY) SEV(99) ```
- Recover BRMS libraries, follow the BRMS recovery report
- RSTLIB SAVLIB(saved-item) DEV(optical device) VOL(media name) OPTFILE('')
- Recover the BRMS related media information using the recovery steps in the BRMS recovery report:
> RSTOBJ OBJ(\*ALL) SAVLIB(saved-item) DEV(device-name) VOL(media name) OPTFILE(\'\') MBROPT(\*ALL) ALWOBJDIF(\*COMPATIBLE) > INZBRM OPTION(\*SETAUT) > SETUSRBRM USER(QSECOFR) USAGE(\*ADMIN) > INZBRM OPTION(\*DEVICE) -
Verify installation device using WRKDEVBRM
- Follow step010 in the recovery report to recover user profiles
NOTE: TCP/IP must be started so BRMS can transfer media required by a recovery from the cloud.
12a To continue the recovery in restricted state, run the following commands:
> STRTCP STRSVR(\*NO) STRIFC(\*NO) STRPTPPRF(\*NO) STRIP6(\*YES) STRTCPIFC
INTNETADR(\'nnn.nnn.nnn.nnn\')
Where ‘nnn’ is IP of recovery system
12b. Otherwise, Start all subsystems using
> STRSBS QCTL, STRTCP
- Run the following to setup Cloud volumes:
> CALL QBRM/Q1AOLD PARM(\'CLOUD \' \'FIXDRVOL ' \'xxxxx1\' \'xxxxx2\' \'xxxxx3\' \'xxxxxn\') - Volume names can be found from BRMS report file name QP1A2RCY
> STRRCYBRM OPTION(\*SYSTEM) ACTION(\*RESTORE)
NOTE: Press F9 on the Select Recovery Items display to go to the Restore Command Defaults display.
-
Ensure the tape device name or media library device name is correct for the Device prompt
-
Ensure *SAVLIB is specified for the Restore to library prompt
-
Ensure *SAVASP is specified for the Auxiliary storage pool prompt
-
ENSURE *YES is specified for create parent directories
- If you are recovering to a different system or a different logical
partition, you must specify the following:
- *ALL for the Database member option prompt
- *COMPATIBLE for the Allow object differences prompt
- *NONE for the System resource management prompt
-
Press "Enter" to return to the Select Recovery Items display
- Restore *SAVSECDTA which will restore user profiles. Change QSECOFR
password using the below command:
> CHGUSRPRF USRPRF(QSECOFR) PASSWORD(new-password) -
Recover configuration data(*Savcfg) and required system libraries
-
Do network configuration and add IP in the target system
-
Ping the cloud resource URI to verify a working network to cloud storage
- Create Virtual tape device and Vary ON the same:
> CRTDEVTAP DEVD(TOR1CLDTAP) RSRCNAME(\*VRT) -
Move the media to *Home location
- Recover User libraries, DLO, IFS as per the BRMS recovery report
```
UPDPTFINF
RSTAUT *All
DSPJOBLOG Output(*Print) ```
- Change the system values as required and do a Normal IPL of the system.