iSCSI VTL backups for IBM i running on Skytap on Azure
This guide is provided “as-is”. Information and views expressed in this document, including URL and other Internet website references, may change without notice and usage of the included material assumes this risk.
This document does not provide you with any legal rights to any intellectual property in any product. You may copy and use this document for your internal, reference purposes.
Table of Contents
- Introduction
- Scope
- Prerequisites
- Section 1. Overview of iSCSI VTL implementation on IBM i
- Section 2. VTL - BRMS configuration and backups
- Section 2.1 Setting up VTL in BRMS
- Section 2.2 Using VTL in BRMS
- Section 2.3 Full system backups for migration
- Section 3. Recovery to target LPAR using NFS
- Section 3.1 NFS server steps
- Section 3.2 Setup LPAR for install
- Section 3.3 Perform scratch install
- Section 3.4 BRMS Recovery
Introduction
VTLs are common in backup implementations in IBM i environments. The features like flexibility, de-duplication, compression, and replication make them perfect for most backup environments.
Most of the VTLs work using Fiber connection, but Power FC connections are not allowed in all cloud providers due to architectural constraints. Therefore, in cloud implementations, we must use iSCSI-based VTLs. A limitation of iSCSI VTL is that it cannot take any backups which need a server to be in restricted mode (Go Save 21,22,23/*SYSTEM etc.) because the server shuts down the TCP during these backups. As a workaround, you can use specially created control groups which help in automating the restricted backups on IBM i servers.
This document overviews the iSCSI VTL implementation in Skytap IBM i LPARs and the process to perform bare metal recovery (full system backups and recovery to target LPAR).
Scope
This document covers the following topics:
-
Overview of iSCSI VTL implementation on IBM i LPARs in Skytap
-
Configuration of control groups for restricted backups on iSCSI VTL
-
Steps to take backups
-
Recovery: Restore to NFS LPAR
-
Recovery: Installation of LIC and OS on target LPAR
-
Recovery: Restore of rest of the data on target LPAR
Prerequisites
-
On prem-server should be at the latest Program Temporary Fix (PTFs) level. The link below provides the minimum level of PTFs for each OS version: https://www.ibm.com/support/pages/system/files/inline-files/IBM i Support for iSCSI VTL 1.4.pdf
-
Source, target and NFS LPARs should be at a supported OS version
-
Required LPPs (MSE and BRMS) should be installed on the LPARs
Section 1 - Overview of iSCSI VTL implementation on IBM i
Once the iSCSI VTL is configured and attached to IBM i LPARs, it shows as a normal physical tape library with tapes in it for backup. From an IBM i OS perspective, once they are connected to the LPAR, there is no difference between a VTL and a physical tape library. The VTL can be used for BRMS or native IBM i backups.
Back to the Top
Section 2 - Virtual Tape Library - BRMS configuration and backups
Section 2.1 Setting up VTL in BRMS
Below are the steps to configure iSCSI VTL on Power LPAR (UNIX):
-
Install iSCSI VTL on UNIX on Power.
-
Configure VTL and assign library and tapes to IBM i LPARs (source, NFS and Target).
-
On the VTL Java console, go to “Virtual tape libraries” and click on “New”.
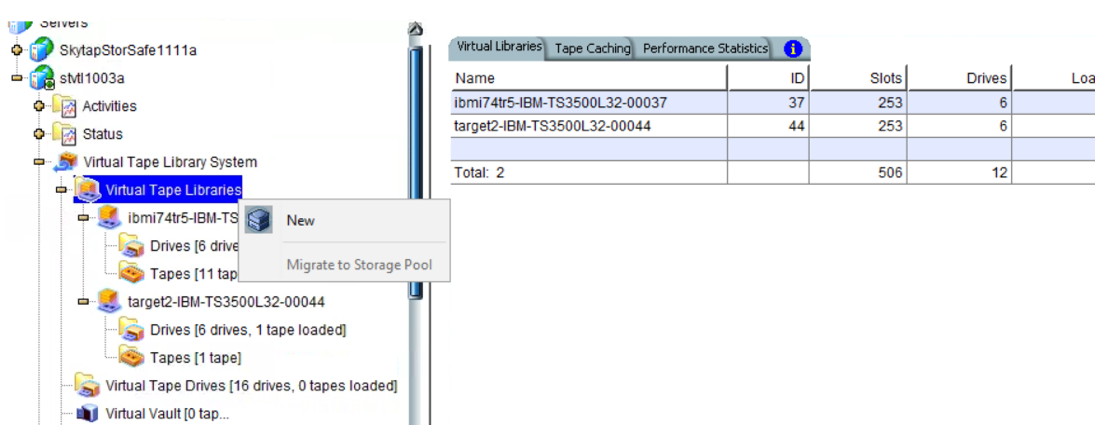
- After the library is created, you can create new tapes.
-
Follow the wizard to create new tapes.
-
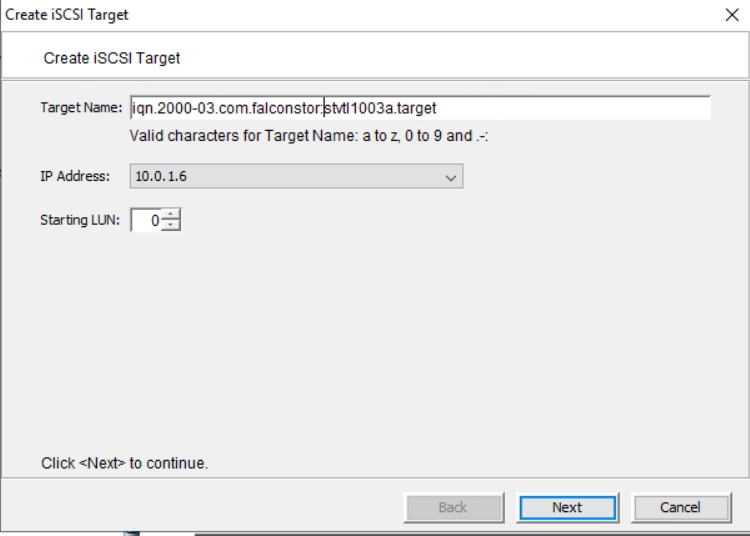
On the IBM i LPARs, create an iSCSI entry using SQL, for example:
CALL
QSYS2.ADD_ISCSI_TARGET(TARGET_NAME=>'iqn.2000-03.com.falconstor:stvtl1003a.vs.target',
TARGET_HOST_NAME=>'10.0.1.6',
INITIATOR_NAME=>'iqn.1994-05.com.ibm:stvtl1003a.vs.target')
-
(On IBM i LPAR) Start Service Tool => Hardware service manager => Logical hardware services => System bus services => find “298A-001” Model => Opt (6) => IPL I/O processor
-
(Java Console) Add a new iSCSI client:
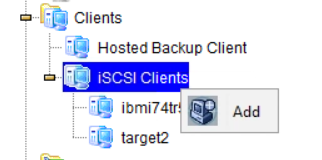
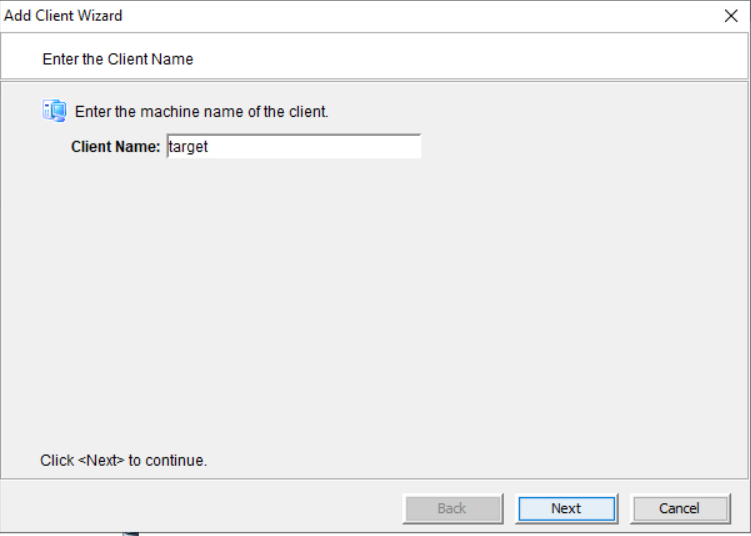
- Select the Initiator Name you entered through the SQL.
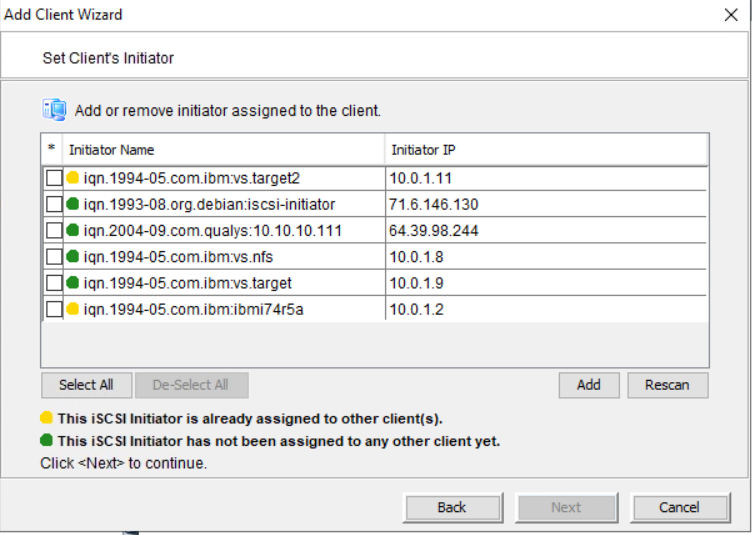
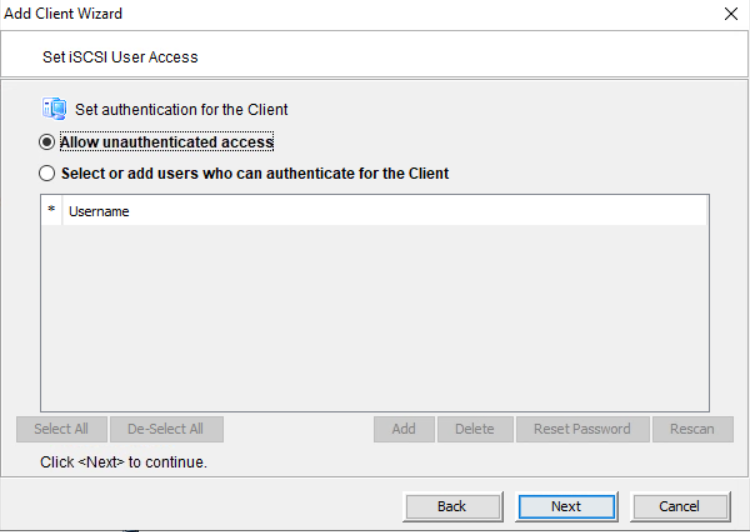
- Complete the wizard to create this client.

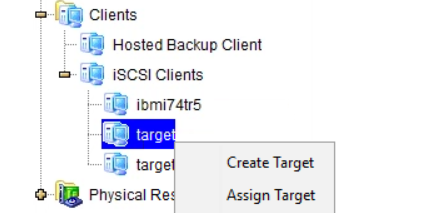
- Create a target for this client.
- Enter the target name to be exactly the same as in the SQL statement.
-
Click on Next and Finish.
-
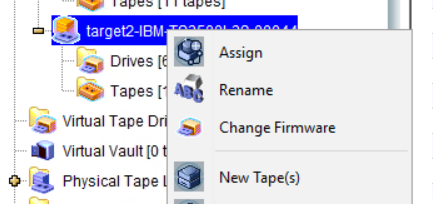
Assign the virtual library to this iSCSI target:
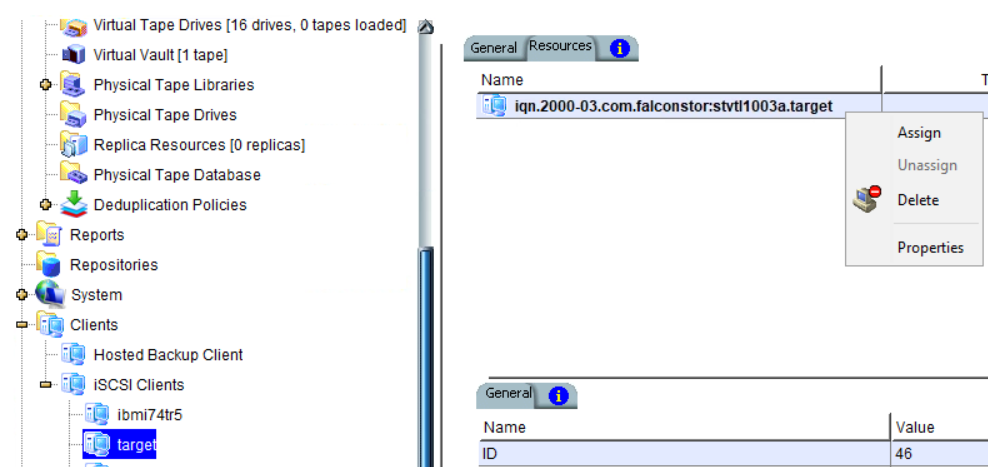
-
Choose the library in the assignment and follow the wizard to the end.
-
(On IBM i LPAR) Repeat steps. Start Service Tool => Hardware service manager => Logical hardware services => System bus services => find “298A-001” Model => Opt (6) => IPL I/O processor
-
(IBM i) wrkmlbsts, you should be able to see the new media library shows up.
Section 2.2 Using VTL in BRMS
Once the VTL is configured on the LPAR and as visible in the WRKMLBSTS command, it is ready to perform native backups. To use the VTL for BRMS, especially for full system backups, perform the following steps:
-
INZBRM *DEVICE
To add this device in BRMS, create the media class, media policies (move and media) add backup tapes etc., as per your requirements. -
INZBRM *NFSCTLG
The above command will create 4 control groups:
-
QNFSIPLFUL: Full OS+ backup on Optical
-
QNFSSYSFUL: Full system and user backup on VTL tape
-
QNFSIPLINC: Cumulative OS+ backups on optical
-
QNFSSYSINC: Cumulative System and user backup on VTL
-
Assign the media policy you created for VTL to QNFSSYSFUL and QNFSSYSINC control groups. Do not change the media policy for QNFSIPLFUL and QNFSIPLINC, because, for these two control groups, the data will be written first on an image catalogue and then automatically to VTL tapes using the media policy of QNFSSYSFUL and QNFSSYSINC media policy details. Below is a screenshot of how these control groups should look:

At this stage, you are ready to use the VTL as a normal tape library for your weekly/daily backups, or as a full system backup for migration.
Section 2.3 Full system backups for migration
To perform a full system backup for migration, perform the below steps on the source LPAR.
-
STRBKUBRM CTLGRP(QNFSSYSFUL) SBMJOB(*NO)
This backup will be taken on VTL tape. -
STRBKUBRM CTLGRP(QNFSIPLFUL) SBMJOB(*NO) OMITS(*IGNORE)
This backup will be run in restricted mode. This will run OS+ backup on an image catalogue -> verify the image catalogue -> copy the image catalogue data to VTL tape using the media policy of the QNFSSYSFUL control group. -
Verify that both backups control groups have been completed successfully.
-
Print the recovery report by running the STRMNTBRM command.
-
Mail this report out of the server and at this point, you can shut down the source LPAR.
Back to the Top
Section 3 - Recovery to target LPAR using NFS
On Skytap, you need to create 2 LPARs (NFS and Target) and assign VTL to both. All the steps we are going to follow now will be in the system recovery report generated in the last step. Below explains the steps for better understanding.
Section 3.1 NFS server steps
Perform the below steps on the NFS LPAR to perform LIC and OS restore on target LPAR using NFS.
-
Ensure that the VTL is visible on the NFS LPAR.
-
Move the tape on which the backup of the source server was done to the NFS server’s VTL.
-
Highlight the tape you want to move.
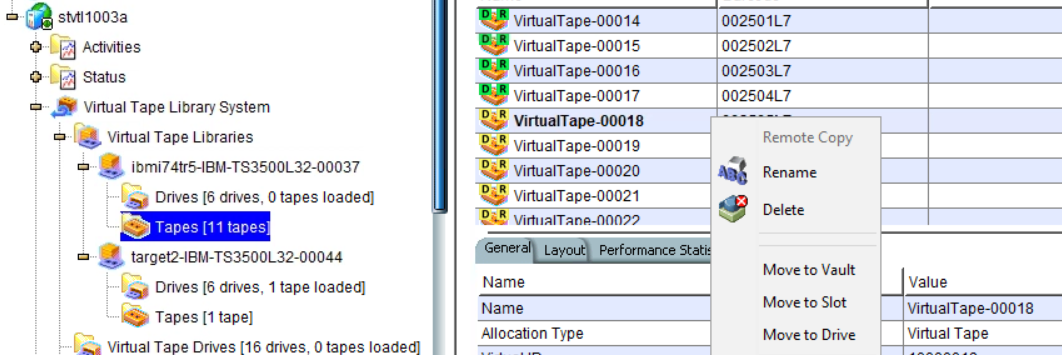
-
Click on “Move to Vault.”
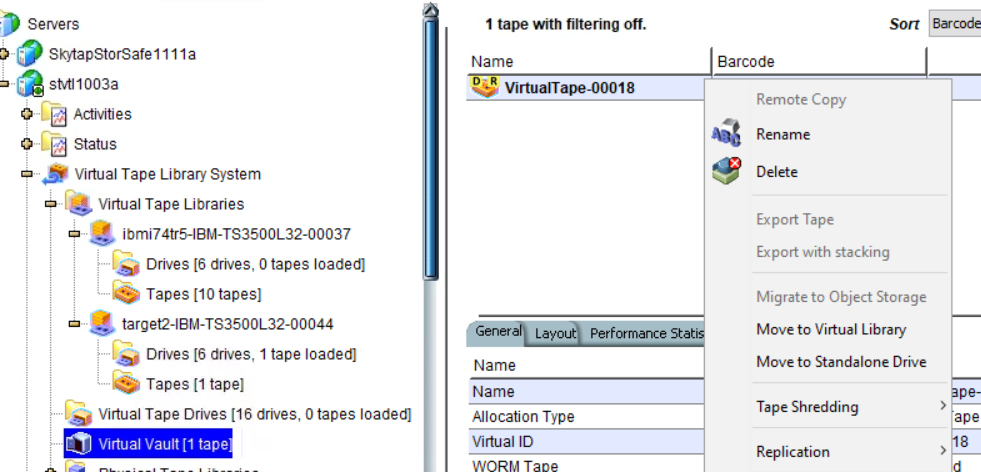
-
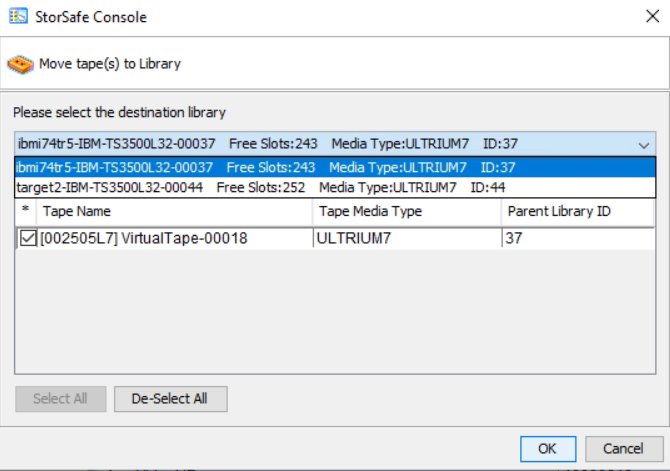
Find the tape in Vault and Client on “Move to Virtual Library” then follow the GUI and choose the library you want the tape to move to.
-
INZBRM *DEVICE\ To add this device to BRMS.
-
Restore the *LINK information from the backups tape, restoring the data required for LIC and OS installation. The details will be in Step 1 of the recovery report. Below is an example:

- Run commands in the recovery report to create an image catalogue, below are examples:

-
Verify the image catalogue with options TYPE(*LIC) NFSSHR(*YES).
-
Set up NFS export options.
-
Run the below commands to allow the target server to read from install files using NFS:
STRNFSSVR \*ALL

CHGNFSEXP OPTIONS('-i -o ro') DIR('/QIBM/UserData/BRMS/cloud/Q1ACQ20571')

CHGAUT OBJ('/QIBM/UserData/BRMS/cloud/Q1ACQ20571') USER(\*PUBLIC) DTAAUT(\*RX) SUBTREE(\*ALL)

CHGTFTPA AUTOSTART(\*YES) ALTSRCDIR('/QIBM/UserData/BRMS/cloud/Q1ACQ20571')

CHGAUT OBJ('/QIBM/UserData/BRMS/cloud/Q1ACQ20571') USER(QTFTP) DTAAUT(\*RX) SUBTREE(\*ALL)

ENDTCPSVR SERVER(\*TFTP)

STRTCPSVR SERVER(\*TFTP)
The NFS LPAR is now ready for the install.
3.2 Setup LPAR for install
On the target LPAR, you must create a LAN console which can scratch install the LIC and OS on the target LPAR using the NFS LPARs image catalogue as the source.
-
Start the target LPAR.
-
Vary off the interactive interface (*IP4DHCP).

-
Note down the CMN resource for the Ethernet port available on the server, normally it's CMN03 WRKHDWRSC *CMN.
-
Vary off the LIND
VRYCFG CFGOBJ(ETHLINE) CFGTYPE(\*LIN) STATUS(\*OFF).
- Set up the LAN console in SST by performing below steps:
STRSST -\> option 8-\> F13 (select LAN adapter) -\> option 1
- Specify the IP details of the LPAR.
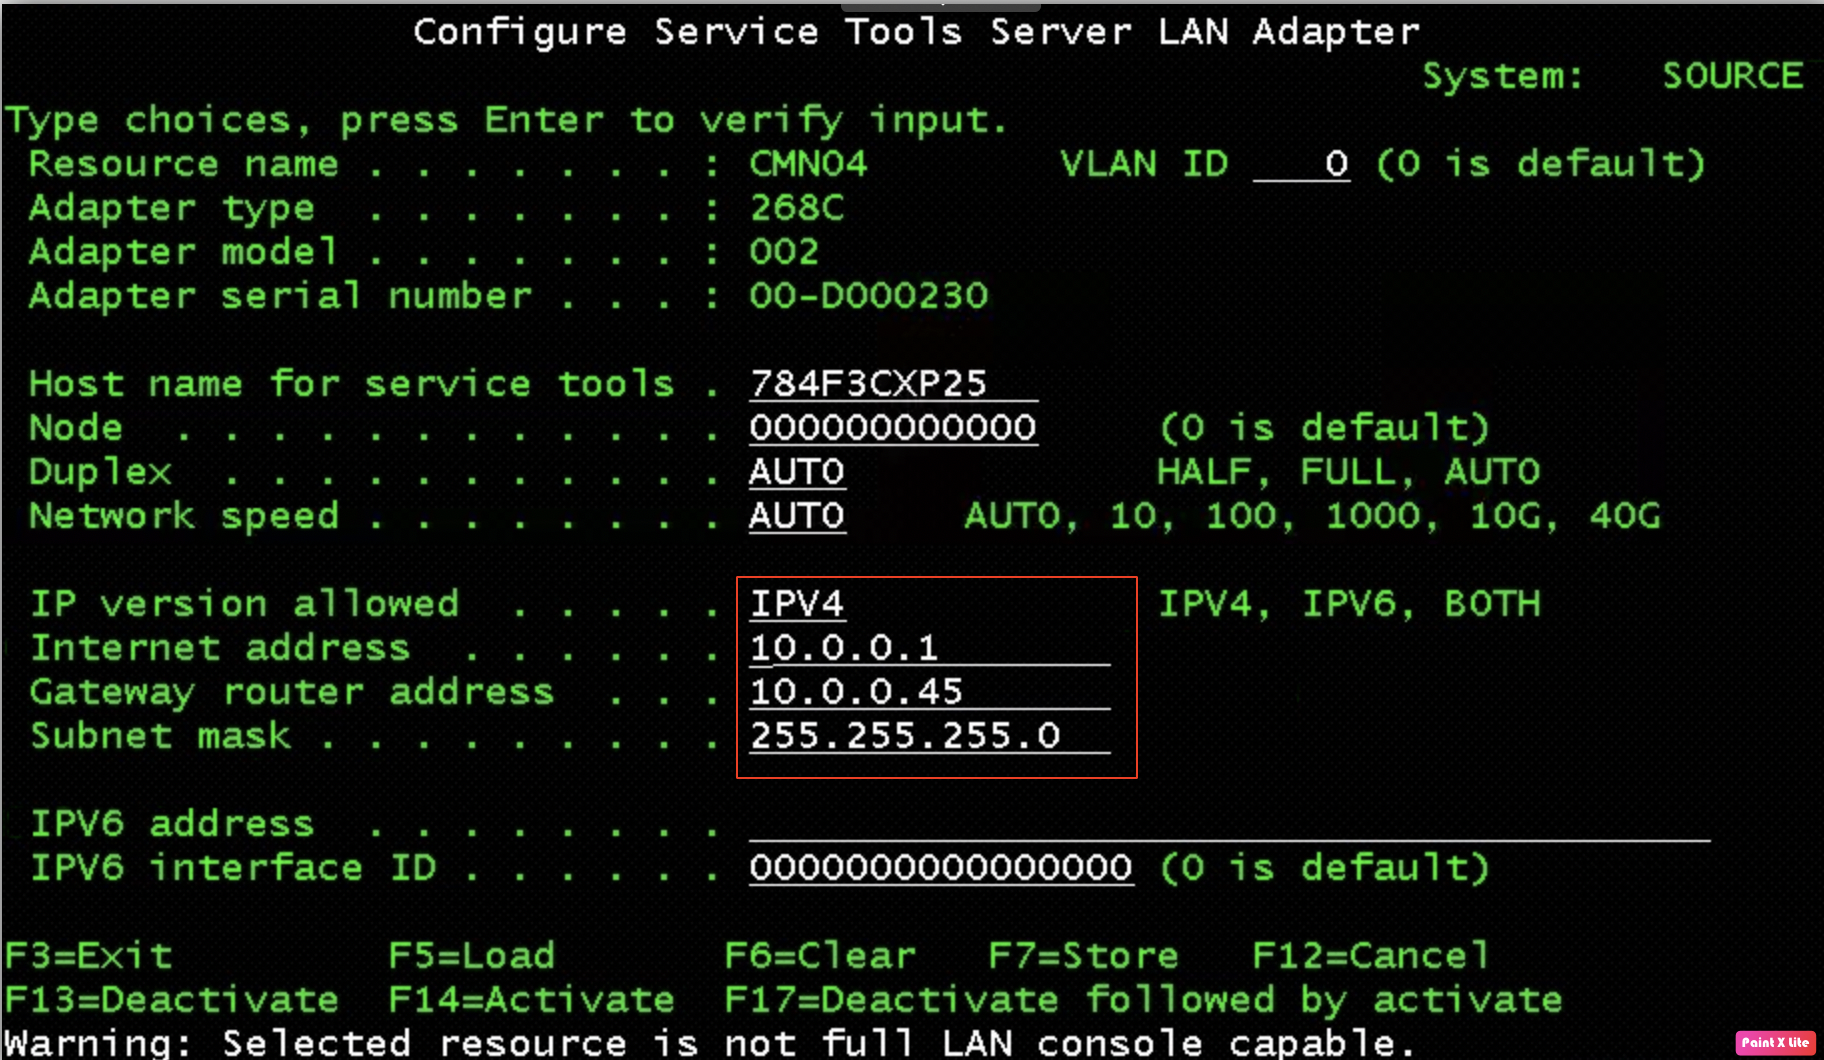
-
Press F7-> F13-> F14 -> F3 out of the SST.
-
Verify that port 3000 is in listen status.
NETSTAT \*CNN -\> F14-\>
Note: search for port 3000
- Create an optical device on target LPAR pointing to the NFS LPAR(10.0.0.2).
CRTDEVOPT DEVD(optvrt01) RSRCNAME(\*VRT) LCLINTNETA(\*SRVLAN)
RMTINTNETA(10.0.0.2) NETIMGDIR('/QIBM/UserData/BRMS/cloud/Q1ACQ20571')
-
VRYCFG CFGOBJ(OPTVRT01) CFGTYPE(DEV) STATUS(*ON).
-
WRKIMGCLGE IMGCLG(*DEV) DEV(OPTVRT01).
The above command should show the .iso file on the NFS LPAR.
3.3 Perform scratch install
Perform the below steps to install LIC, and OS on the target LPAR:
- STRNETINS with the below parameters:
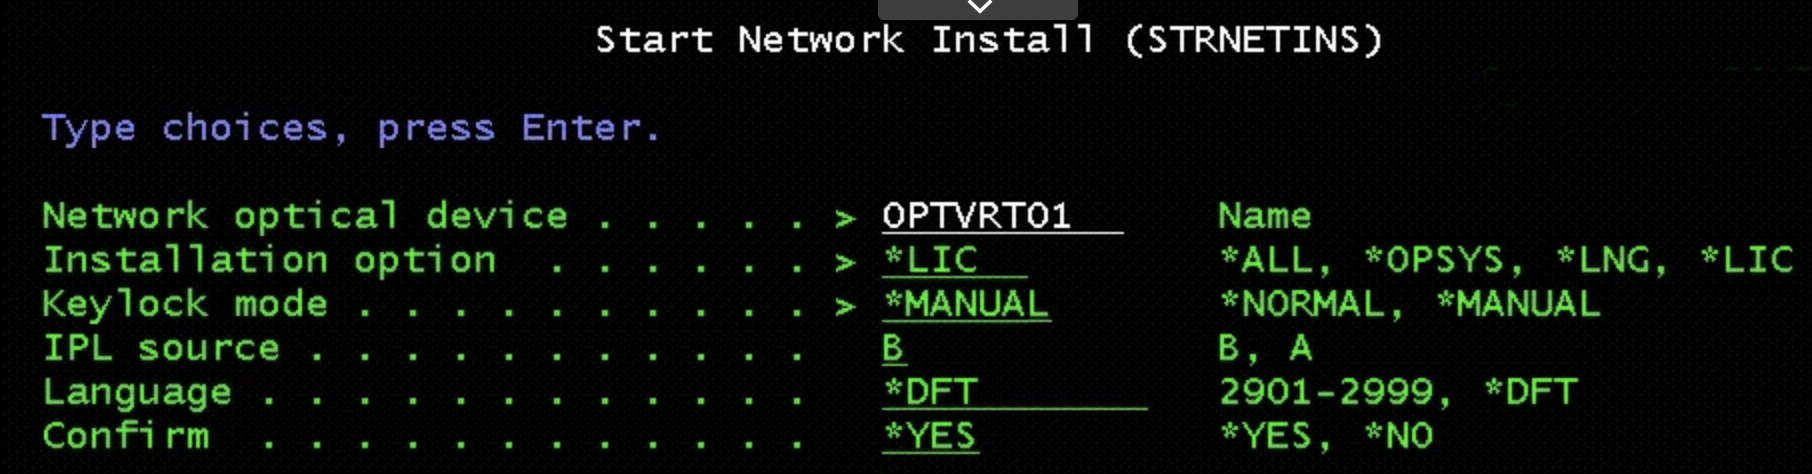
Note: It will take some time and will show you the “Install LIC Screen.”
- Proceed with LIC installation by taking Option 1.
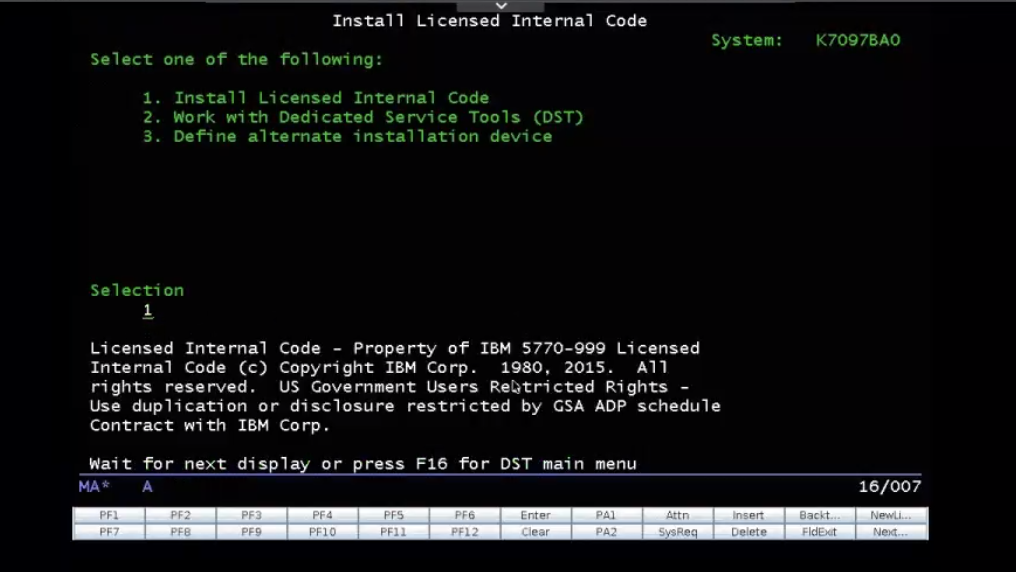
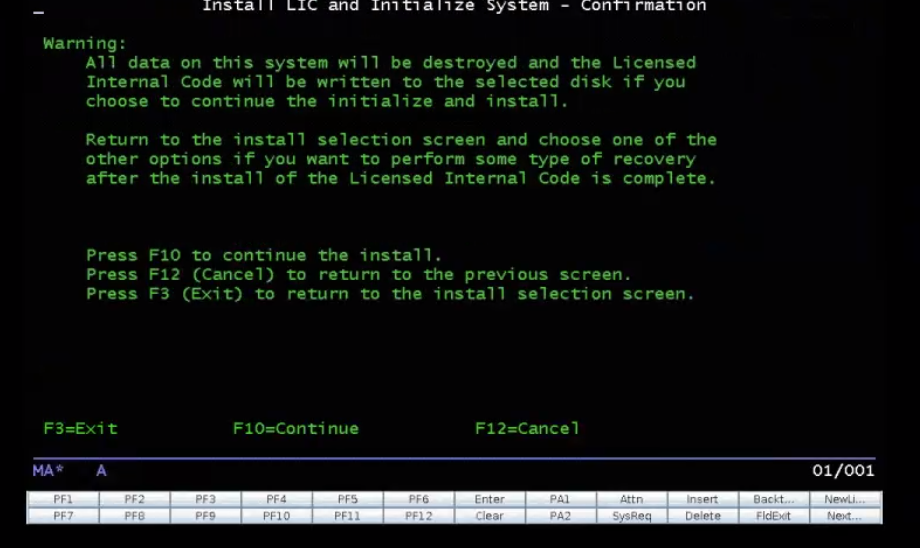
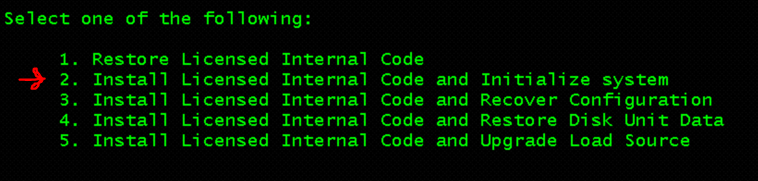
- Choose Option 2 to Install LIC and Initialize the system (on the target system that we will be building from the scratch).
-
Press F10 to continue.
-
Post LIC Installation, do Disk Initialization if you have more than 1 LUN assigned on target LPAR.
-
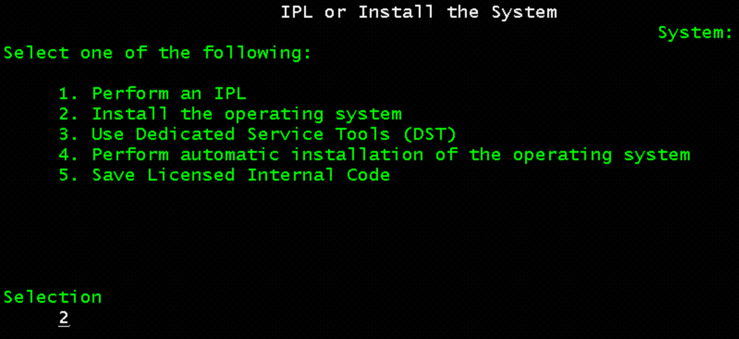
Install OS using the below option (Select Option 2- Install the operating system):
-
Log in using QSECOFR.
-
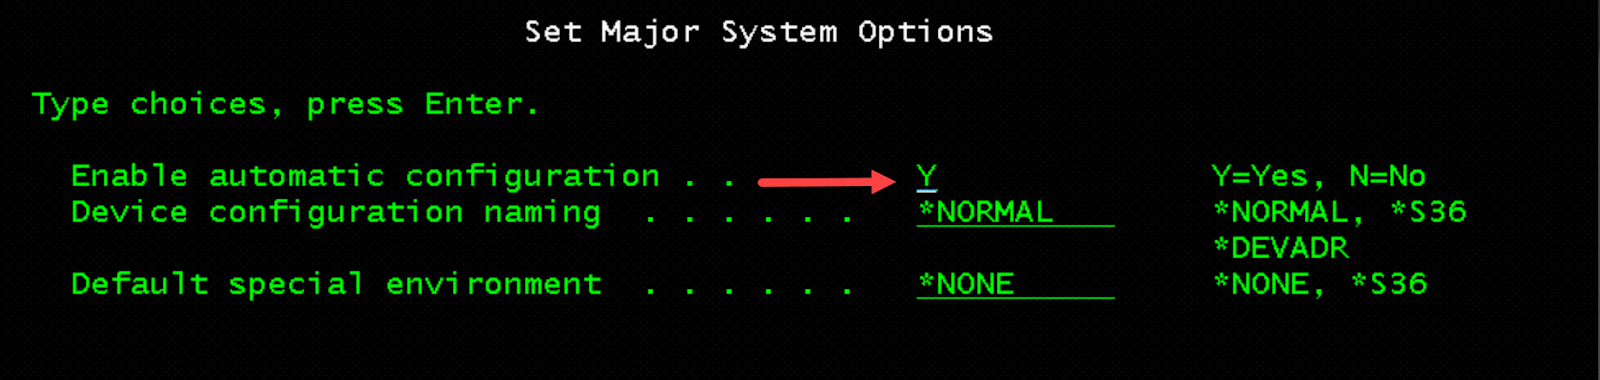
Enable automatic configuration – Y on the set major system option screen.
- Change the following on the next screen:
-
Set date and time
-
Choose System Time Zone
-
Start print writers = N
-
Start system to restricted state = Y
-
Set major system options = Y
-
Define or change the system at IPL = Y
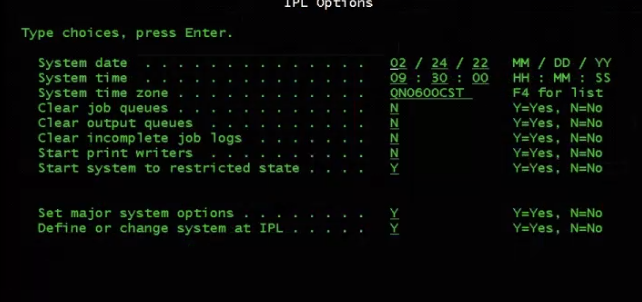
-
Press Enter to continue.
-
Select Option 3 twice (Select System Value Commands > Work with System Values) to change the following system values:
-
QALWOBJRST *ALL
-
QFRCCVNRST 0
-
QINACTITV *NONE
-
QJOBMSGQFL *PRTWRAP
-
QJOBMSGQMX 30 (minimum, 64 recommended)
-
QLMTDEVSSN 0
-
QLMTSECOFR 0
-
QMAXSIGN *NOMAX
-
QPFRADJ 2
-
QPWDEXPITV *NOMAX
-
QSCANFSCTL *NOPOSTRST
-
QVFYOBJRST 1
- Press F3 twice and change the QSECOFR password.
Note: the current QSECOFR password will be QSECOFR (capital letters).
3.4 BRMS Recovery
At this stage, the LIC and OS are installed on the target LPAR and you can proceed by taking these next steps in the recovery report.
- Recreate the virtual optical device on the target LPAR:
CRTDEVOPT DEVD(OPTVRT01) RSRCNAME(\*VRT) LCLINTNETA(\*SRVLAN) RMTINTNETA(10.0.0.2) NETIMGDIR(\'/QIBM/UserData/BRMS/cloud/Q1ACQ20571\').
-
Perform steps specified in the recovery report Step 5 (recover the BRMS product and libraries).
-
Skip Step 6 in the recovery report.
-
Perform Steps 7 to 14 in the recovery report, skipping Step 8).
-
Save the QSQL library from NFS/ source LPAR, FTP it to target LPAR and restore it to target LPAR.
-
Configure and assign VTL to the target LPAR and move the backup tapes to it.
-
Perform Steps 16 to 32, skipping Steps 17, 23,24,25 and 28.
-
After IPL, configure the IP on LPAR as per the available CMN resource.
At this stage, the full system restore of the LPAR is completed and the LPAR can be released for user testing.
Back to the Top
Next steps
Main Overview
Operational Excellence
Resiliency
Migration Solutions
Design
Security